Tuesday, February 28, 2017

Painted Wood Rug

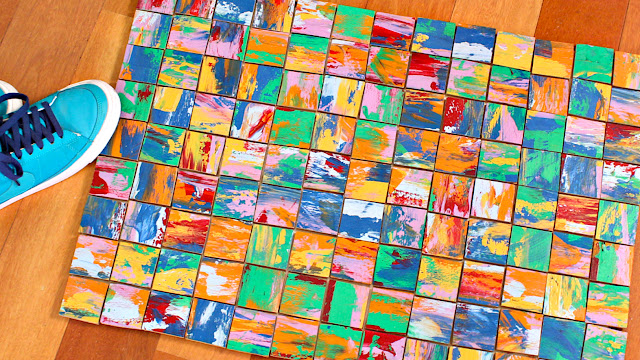
I'm always thinking about rugs....I'm kind of obsessed with them and currently own more than I have the floor space to put them.   That's another story.  Recently I painted a rug for my bathroom on heavy fabric and thought that I might be able to do the same thing on some wood......It makes sense, right?  If you can have wood floors, why not a wood rug?  The only glitch was how to make it somewhat flexible.  Well, I figured it out and this is what happened.  Remember to think outside the box, use materials you wouldn't normally think to use and always Make Your Mark!
My wood abstract art rug

My sneaks look damn good on this, too!
 Watch how easy it is to make here!
STUFF I USED
Americana Decor Outdoor Living Paint
E-6000 Glue
Heavy canvas or denim
1/4" plywood the size you want your rug
Heavy canvas or denim a bit bigger than the plywood
HERE'S HOW
1.  Paint colorful stripes on the plywood
2.  Using cardboard rectangles, spread more color over the stripes
3. When dry, draw a 2" x 2" grid on the back of the plywood
4. & 5.  Cut out the squares with a jigsaw
*Sand the edges if you need to
6.  Using a generous amount of E-6000, glue them to the canvas 
*Trim the canvas if necessary
Art for the floor!


Tuesday, February 21, 2017

Faux Stained Glass

Picture it.....3rd grade art class in early December sometime in the late 70s and I'm rocking a tissue paper stained glass & construction paper masterpiece for the holidays.  Cut to a few weeks ago when I channeled that chubby, glue obsessed 3rd grader and made a tissue stained glass project that's a bit more permanent.  I coated this number with Glaze Coat resin and now I can have it in my house or garden forever!  This is a fantastic way to UP-style an old window pane or even make a piece of art.  Remember to stick to the basics, use simple craft supplies and always Make Your Mark! 
Just needs a little light
Resting in the garden
Everything looks better in 3s
Watch how it's done here!
STUFF I USED
Old window pane
Tissue paper
Glaze Coat (2 part epoxy resin)
1. & 2.  Sketch out your design and place it under the glass window to use as a guide
3. 4. & 5.  Cut out large ovals, 1" circles and different color green leaves in tissue paper
6. Cut small oval holes in the large ovals and then use that smaller oval as a guide to cut out the same size oval in a different color
*These for for the center of the large oval flowers
7. 8. & 9.  Decoupage the large oval flowers and the different color centers on the glass and then add the dots and leaves
10.  Fill the empty spaces with large light green leaves
11.  Outline the flowers, dots and leaves with the Allure in Gloss black and let dry
12. & 13.  Mix the Glaze Coat (follow instructions) and pour it on top of the glass
14.  Evenly spread the Glaze Coat with a sponge brush
15.  Pop the bubbles with a small torch OR a long arm lighter
*Cover and let cure


Let the sunshine in!
Stained and stunning!


Friday, February 17, 2017

Coloring Book Jewelry with Colorit!

So you have a hundred beautiful colored coloring book pages just sitting there in books and you have no idea know what to do with them.....Well, I'm here to help.  Why not turn a few of your favorite pages into some colorful jewelry with this easy technique?  This is a great project for the kids, too!  I found an amazing company called ColorIt and asked if they would be interested in a collaboration and the next thing you know I'm addicted to their products and we're working together.  I love how life works out sometimes!  Check out what I was able to do with a few pages from their Mythical and Fantasy coloring book.  Remember to use your art, take risks and always Make Your Mark!
Who doesn't love a mermaid?
Who doesn't love a magical fairy ring?

Watch how easy it is to make here!
STUFF I USED
ColorIt Adult Coloring Books (10% off with the code MONTANO10)
Tiny glass rhinestones
 HERE'S HOW
1.  Color a page that you want to turn into a piece of jewelry
2.  Reduce and color copy it on to the clear ink jet Shrink Film
3. & 4.  Carefully cut out your images and punch a hole in them for necklaces and earrings
5. & 6.  Preheat oven to 350° and bake your pieces on cardboard until they fully shrink
*If they are a bit wonky just press them flat on the counter top as soon
as you take them out of the oven
7.   Embellish the pieces with tiny rhinestones using a crayon (to hold each stone) and E-6000 Glue
8.  Connect the pieces to chain with jump rings
9.  Glue them to colorful ring bases
Make a set for your fantasy loving friends
Make sure to check out www.ColorIt.com

Tuesday, February 14, 2017

Ikea Hack String Art Table

It might be too early in the year to say this, but here is my favorite project for 2017!  It took a while to figure out, but once I got going I couldn't stop.  I made a version of this for a room on While You Were Out but it had been a while and I used a different style of table.  Since the Ikea LACK table is so popular and inexpensive, I think it's the most fun to makeover anyway.  If you don't have access to Ikea, no worries, this technique will work on almost any table you can find.  I'm thinking if you have a cat, this might not last very long!  Remember, have fun, buy lots of different colors of 99c store yarn and always Make Your Mark!
This project REALLY makes me happy!
Very hard to photograph in my tiny house!
Grab a square of glass for the top if you want!
Watch how I put it together here!
STUFF I USED
Different colors of yarn
300 1" long nails
Hammer and ruler
HERE'S HOW
1. & 2. Paint the 2 table tops in Aubergine and 4 table legs in True Teal
3. Mark every 1" all around one table top and around the 4 sides of both table tops
4.  Mark 1/2" from one corner on both sides of each leg as shown
5.  Add a nail to each mark all the way around the tables and on the corners of each leg
6.  Knot yarn on the corner nail of the table top with nails on top (and the sides) and wrap it to the adjoining line of nails back and forth between lines of nails and moving down the row as you go
*Don't panic, you'll get this and you can unwrap it if you make a mistake
7.  Do this on both sides of the table (you can see how it looks in photo #10)
8.  Flip the yarn wrapped table over and screw in the legs using E-6000 glue to keep them in place and making sure that the two rows on nails on the corner are facing outward
9. & 10.  Add glue to the bottom table top (with only the nails around the side) and then place the table on top to dry
11. 12. & 13. Knot yarn in one corner and start wrapping from the top row to the side row, moving one nail at a time and wrapping 3 rows of the nails, then knot the end
14.  Change colors and repeat the process on the opposite side so the colors overlap
15. Secure all the knots with a dab of E-6000 Glue so they are permanent
*Add glass on the top if you want
 The envy of all other tables!
 A cat's dream!


Tuesday, February 7, 2017

Let's Make a Rug!

Like many of you, I have color schemes I like to follow in each room in my house.  The bathroom is olive green mixed with dark teal and I love it.  For the life of me I couldn't find a rug to match that was big enough for the space.  I came close a few times, but alas, no luck!  It was time to take matters into my own hands.  I found the heaviest fabric I could and rocked a mandala stencil and some multi-surface paints to get the look I wanted.  It took some time, but it was much less frustrating than the endless rug searching.  Remember, if you can't find it, make it and always Make Your Mark!
Trying it out in my foyer


Watch how I made it here!
 STUFF I USED
Heavy poly-cotton fabric
Cotton fringe
Foam grip drawer liner
I find that cleaning your stencils in between uses with 99c store Totally Awesome works perfectly 
and keeps them in perfect condition!
HERE'S HOW
*Cut your rug fabric 1" larger all the way around before you start
1. & 2.  Press the edges of the fabric in 1" all the way around and glue them in place with E-6000 Fabri-Fuse
3.  Add masking tape around the edges about 1/2" in and then add more tape 1" from that to create a 1" border around the rug
4.  Using your stencil brush, fill in the 1" border around the edge of the rug
5.  Center the Mandala stencil on the rug and tape down
6.  Figure out your colors and start painting
7.  When you've painted the stencil (clean it) and then edge the shapes with a paint marker
*This takes some time but makes the rug look like a hand blocked rug from India
8. & 9.  Instead of a paint marker you can also use a writer tip with black Multi-Surface Satin paint to get the detail
10. If you want more pattern like I have, use the stencil around the edges making sure to tape over the areas that are already painted
11.  Glue the fringe on the underside of each edge with more Fabri-Fuse
12. Glue the foam grip drawer liner to the underside of the run over the raw edges to add some cushion and to make the rug non-slip


Sunday, February 5, 2017

Learning Facebook Live

New technology is always a bit daunting.  As much as I'm willing to experiment with a new paint product, glue or power tool, it's just not that easy for me to press a button on my computer when I have absolutely no idea what is going to happen.  A few weeks back I overcame my fear and hit LIVE VIDEO on my Facebook page and, though I was a bit nervous and apprehensive, I managed to get through my first FB Live experience.  Not the easiest format to get used to, but I really enjoy getting to talk to all of you and have a real interaction.  The bonus is that you get to meet Julie, my amazing assistant who is the right hand in the Make Your Mark operation!  Here we are talking about the ins and outs of life at Make Your Mark.
1st attempt:  Biggest suggestion is to have something to talk about!  Otherwise you're just sitting there looking like a doofus!
2nd week:  Maybe having a time limit is a good idea!  I'll admit it, I got a little carried away and kept yakking way too long.
Getting the hang of it:  Work out the kinks and loved having my sidekick there to chime in.  Two is always better than one.
My most recent:  A bit more relaxed and prepared.
Join us (for now) at 12 p.m. PST most Fridays
or look for the recorded version to watch at your leisure

Friday, February 3, 2017

Mixed Media Rubber Stamps DIY!

A couple of years back I made silicone molds with bathroom silicone and cornstarch.  It was a pretty popular project, too.  Recently when I was looking at a box of the molds I'd made, it popped into my head that this same method could be used for making rubber stamps. STOP THE TRAIN! How did I not think of this before?  I immediately went to work figuring out how to make it happen.  Remember to revisit your old projects and try them in a different way.  Oh, and always Make Your Mark!
My two favorite so far 
The DecoArt Media Fluid Acrylics are rocking my world!

Watch how easy they are to make here! 
 STUFF I USED
Wood blocks
Wax paper and Corn Starch
Baby Oil
HERE'S HOW
*Before you start you might want to put on some disposable latex gloves.....This is messy!
1.  Squeeze a generous amount of silicone on a piece of wax paper
2.  Add the same amount of corn starch to the silicone
3.  Add 2 drops of baby oil
4.  Knead the mixture into a ball
5.  Press the ball onto an embossing folder with a texture or image you like
6.  Wait about 20 minutes and then peel off your rubber stamp
7.  Place the stamp face down on a flat surface and squeeze a generous amount of E-6000 all over the back of the stamp
8.  Carefully press the wood block on top and let dry
9.  Stamp away with either ink or paint
*I like using paint