Showing posts with label redesign with Prima. Show all posts

Tuesday, January 17, 2023

Decorative Books For Your Guest Room

I finally have 2 guest rooms to decorate and I'm going nuts with fun projects so that my friends are comfortable and happy while they visit!  For my friends who love to read before bed, I grabbed a stack of thrillers from the thrift store and turned them into something beautiful.  I will use decor transfers on almost anything and WOW did I love figuring out how to put them on these book spines.  I'll leave links to everything I used for this project right under the video below.  Happy decorating and don't forget to Make Your Mark!
Put the covers on the inside so they know what they're reading and they can use it as a bookmark!
A scented candle is always nice, too!  Don't forget to have a piece of paper with the wifi password, too!
Watch how to make these beautiful books here OR watch this and other videos on my
Everything I used for this project:
Re-Design with Prima Royal Burgundy Decor Transfer: https://bit.ly/3Kl6UdO Re-Design with Prima Imperial Garden Decor Transfer: https://bit.ly/3CmZOT9 Harlequin Stencils: https://amzn.to/3ZoaUTe Re-Design with Prima Script Stencil: https://bit.ly/3GrIHlQ MY AMAZON STORE: https://www.amazon.com/shop/markmontano
Either upright or side by side, this stack of books looks beautiful and serves a purpose!
Happy creating everyone! 
Love, Mark


Thursday, July 22, 2021

Desk Makeover with RE-DESIGN WITH PRIMA!

As much as I love Ikea for a shelf or quick, functional fix, I'm not a huge fan of their fabric or color choices. Can we say BORING?! This Ikea desk was plain white, nicked in a few places and truly in need of a new look.  The best part is that I scored it for $15, so basically it was a canvas for me to experiment on.  Lately I've been working with RE-DESIGN WITH PRIMA products and they've changed the way I look at furniture makeovers, so I decided to try their Decor Transfers on the face of the drawers & cabinet. WOW do they pack a punch!  I'll leave a list of what I used below, but definitely check out RE-DESIGN WITH PRIMA and paint up some of your Ikea furniture!  
Now get out there and Make Your Mark!
Caravan Decor Transfer and brass handles really spruced this up!
A nice desk makes you want to sit at it and even pay your bills!
Everything I used for this project:
Re-Design with Prima Caravans Decor Transfer: https://bit.ly/3dSrAMB Bohemian Florals Clearly Aligned Decor Stamps: https://bit.ly/36yoLfD White Decor Ink Pad: https://bit.ly/3wmmvCr Americana Decor Chalky Finish Paint: https://bit.ly/3jjCa2x MY AMAZON STORE: https://www.amazon.com/shop/markmontano
Watch how to make this here!
or watch how to make it on YouTube here: https://youtu.be/lXDidLSX_zU

Generally I'm not a huge fan of red white & blue in decor, but the light blues and different shades really made this pattern sing to me!
Time to sit down and start writing another book, right?!

Tuesday, January 14, 2020

Gorgeous Decorative Candles DIY

I originally made these candles for the holidays, but I love them so much they're going to stay out for the rest of the year or until they're gone!  I used real wax pillars for these, but honestly, the battery operated pillars would have been a better choice.  Still, I'm just super happy with them.  I painted the hot glue pieces with metallic silver and then added some Galaxy Glitter to make them sparkle even more.  If you haven't tried using hot glue in silicone molds, it's addicting!  Hot glue is also much more sturdy than most clays and you can shape it with a hair dryer!  
Be a mad scientist when you're creating and always
Make Your Mark!
 Nothing like a crystal ball to magnify the candle glow!
Clustered on a silver thrift store tray

Watch how to make them here!
LINK to my favorite molds: https://amzn.to/2tifkAM
Fill a mini cloche with your favorite souvenirs!

Decorate the way you want!  It's your home!

Friday, January 25, 2019

Cardboard and Hot Glue Rusty Valentine Hearts

I went to a pumpkin carving party right before Halloween and on the fence in my friend's backyard were rusty tin birds that look like they had been there for 50 years.  They looked like they had weathered harsh winters, rain and scorching sun over and over again.  When I got home I started figuring out how to get that rusty look in a simplest of ways.  Finally, after studying a hundred photos of rust with a cup of instant coffee in my hand, it came to me...This is the perfect heart to give someone you've weathered the storm with.  Lead with love, my friends and don't forget to 
Make Your Mark!
 Cannot wait to give these away!

 It's like they've been waiting in the rain for 50 years!
Watch how to make them here!
STUFF I USED
99c Store Instant Coffee
Americana Acrylics in Dark Chocolate, Burnt Orange and Sea Aqua
Wire
Redesign With Prima Silicone Molds
Hot Glue
Cardboard
Wire Cutters
 HERE'S HOW
1.  Cut out cardboard hearts
2.  Fill silicone flower molds with hot glue
3.  Glue the molded pieces to the cardboard hearts with more hot glue
4.  Paint the centers of each heart with Sea Aqua
5.  Dab around the edges and on the flowers with Dark Chocolate
6.  Dip the brush in more Dark Chocolate and then instant coffee and 
then dab around the heart
*Use a decent amount and build the texture
7.  Dip your brush in Burnt Orange and instant coffee and keep dabbing
8.  When dry, add more Sea Aqua
9.  Punch holes at the top and base of the heart
10.  Bend wire to create a handle and attach at the top two holes
11.  Add a rust look to a tiny brass bell and attach to the base with a wire ring
12.  Add some paint to the wire handle and wire ring
I prefer a rusty heart!

Happy Valentine's Day!

Friday, December 21, 2018

Trash to Treasure Thrift Store Flip

I always appreciate a good thrift store.  Give me 20 minutes and $10 and I'll come out with something amazing for an upcoming DIY project.  Lamps, vases and frames are in abundance at most locations and they're so easy to paint and decoupage to match your decor.  For this random set I used flowers printed from my home computer, Stick & Style Stencils from Redesign With Prima and Americana Decor Texture Medium in Bright Gold.  DONE!  These 3 elements can turn any 3 random pieces into an amazing vignette for your home.  I've included the flower images I used below.  Make sure to check out the video to see exactly how I did it.  Happy hunting and don't forget to
Make Your Mark!
 I adore this set!
The Texture Medium gives dimension and richness to the pieces
Toss in some books and a plant and you're golden!
Watch how I did it here!
  
  
Images to print 

Happy decorating!

Tuesday, November 27, 2018

Boho Renaissance Ornaments

These ornaments are inspired by Shabby Vintages Studio.  Check out her work on Pinterest!  For mine I added tons of color,  seed pearls, glitter and some favorite images to make them fit my aesthetic.  I named them Boho Renaissance Ornaments only to realize later that I have a Victorian image mixed in...Things happen.  It's the wild west when you're making Christmas ornaments.  Once again I used my  re•design with Prima molds and the basswood round ornaments from Walnut Hollow.  Like all of my projects, you can use the images you want.  I'd love to see a set with vintage family photos.  Fill your tree with handmade ornaments and don't forget to Make Your Mark!
Renaissance with a dash of Victorian!
Pearls and snow glitter make them even more Christmas-y!

Watch how to make them here!
STUFF I USED
re•design with Prima molds
Birch Ornaments from Walnut Hollow
Renaissance images
E-6000 Glue
Renaissance images
Print to size
HERE'S HOW
1.  Trace around your basswood round ornament on the back side of the image
2.  Decoupage the image onto the basswood round
3.  Stencil over the image with Matte Metallics in Vintage Brass to give it an illuminated feel
4.  Sponge around the edges of the ornament with more Matte Metallics in Vintage Brass
5. Mix the 2 part plastic and fill the re•design with Prima molds
*The 2 part plastic hardens in about 15 minutes or so
6.  Wipe off the residue on the molded pieces and paint with Matte Metallics in Vintage Brass
7.  Dry brush the pieces with different colors of Americana Multi-Surface Satin Paint
8.  Hot glue a thin ribbon on the top of the ornament and a tassel at the base of the ornament
9. & 10.  Sandwich the ribbon and tassel top between the ornament and painted molded pieces
11.  Using white glue, add seed pearls to the edges
12.  While the glue is still wet, sprinkle with snow glitter and let dry

Happy Christmas!

Friday, November 2, 2018

Mexico Inspired Ornaments

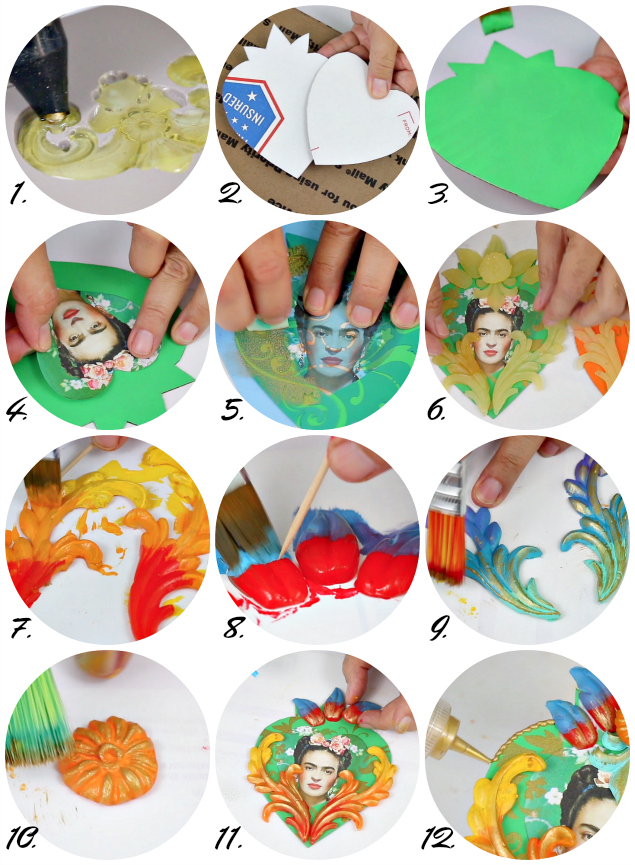
I love everything about Mexico.  The color, the art, the architecture and the FOOD all make me fantastically happy!  It's part of why I love living in Los Angeles so much. Years ago I bought a painted, hand carved ornament in Mexico City and have always been inspired by it.  These are a cardboard and hot glue version of that ornament and I couldn't be happier with them.  Grab a few re•design with Prima silicone molds and you'll be making ornaments for the next 10 years!
We have tons of ornament DIYs coming your way so stay tuned and don't forget
to Make Your Mark!
Fabulous Frida!

Use images or just go for color!
STUFF I USED
Cardboard 
Glue gun and tons of glue sticks
Images of Frida or sacred hearts
HERE'S HOW
1.  Fill the re•design with Prima molds with hot glue
*I like to use 2 large glue guns with the big fat glue sticks so that I can fill them quickly
2.  Cut out hearts in cardboard
3.  Paint the pieces in bright colors
*I used Americana Acrylics in Bright Orange and Bright Green
4.  Cut out and glue an image in the center of one of your hearts
5.  Stencil around the image with DecoArt Matte Metallics in Vintage Brass
*I used a Tracy Moreau stencil for this ornament
6. Figure out the molded piece arrangement
7. & 8. Paint the pieces in more Americana Acrylics and let dry
9. & 10.  Dry brush the pieces with Matte Metallics 
11.  Glue the pieces to the cardboard
12.  Edge in E-6000 Dimensional Design Adhesive Paint in Gold Leaf
Fiesta Fantastic!
Feliz Navidad!