Tuesday, August 29, 2017

Easy, Intricate Wood Burning

I don't remember much about my wood burning experience as a kid except that my parents made me do it at the kitchen table and hovered over me like I was absolutely going to burn down the house. Perhaps I didn't enjoy it as much as other kids?  Not long ago Walnut Hollow sent me their amazing Creative Versa-Tool and I got to go at it again with out being hawk-eyed!  What freedom, too.  I decided to whip out my favorite adult coloring book pages for this project because they are FILLED with amazing designs and inspiration that work perfectly for wood burning.  Remember, mash up your different crafts and ALWAYS Make Your Mark!
Tray chic!
 Rainbow box, baby!

 Watch how I did it here!
STUFF I USED
Carbon paper and red pen
Walnut Hollow trays, serving boards and boxes
Adult coloring book pages
 HERE'S HOW
1.  Enlarge your pattern so it fits on your wood object the way you like
2. & 3.   Place the tracing paper face down on your surface and then tape the enlarged pattern over it
4.  Trace the pattern with a red or blue ball point pen so know where you've traced
5. Screw in your wood burning tip on the Versa-Tool and with the setting on high,
 start tracing your pattern just like you were drawing
6. & 7.  For the tray I filled in the burned flowers with Unicorn SPiT
8. & 9.  For the box I painted around my wood burned pattern instead
10.  Mix Famowood Glaze Coat (2 part epoxy resin) according to directions
11. Pour on your surfaces and spread out evenly with a sponge brush
12. Pop the bubbles with a long arm lighter or a small butane torch
Cover and let cure overnight and you're done!
Gorgeous and glossy
Burned and beautiful!

Friday, August 25, 2017

Oly-Fun Fabric Beads

If you haven't played with Oly-Fun yet, you're missing out.  This stuff is like fabric construction paper and it comes in tons of different colors, too.  A few weeks ago, I was cleaning out my craft house and found a stash of fabric beads and it got me to thinking about how I might use Oly-Fun for a fabric bead project.  After a little experimenting, I got hooked.  The best part is that you can mix colors to create different looks.  The greens and blues make a terrific malachite effect and the black, tan and white together look like singed wood!  Remember, experiment until you come up with something amazing and always Make Your Mark!

Rhapsody in blue!
Knotted and ready to wear!
Watch how I made them here!
STUFF I USED
Tea lights
Glass plate
 HERE'S HOW
1.  Pick your Oly-Fun colors.  I used 6!
2.  Stack them and cut out the bead pattern
3.  Roll the cut stacks around the end of a slim paint brush
4.  Trim the staggered ends
5. & 6.  Singe the end of the rolled bead and quickly roll it on the glass
*This will seal the rolled end to the body of the bead
7.  Continue to singe the body of the bead (which will expose each of the colors) and then quickly smooth out the bead by rolling it on the glass plate
8. & 9. String the beads on thick satin cord and knot between each one
I love how the colors blend together!

Tuesday, August 22, 2017

Cardboard Tile Ikea Hack

On a recent trip to New Mexico I saw a simple tile table at the airport while waiting for my flight.  The tiles were unique and beautiful and I was totally inspired to make a tile table the minute I got home.  Pretty quickly I realized that beautiful tiles were expensive and not very easy to find!  I thought about painting some ceramic tiles but wasn't sure how scratch resistant they would be.  Finally I decided on painted cardboard tiles with a resin coating.  This project has opened up a new decorative tile world for me!  Remember, where there's a will, there's a way.  Oh, and always 
Make Your Mark!
My stenciled tile table!
I love the random mixed patterns

 
Watch how I made it here!
STUFF I USED
Stencils
4" x 4" cardboard tiles
Hammer and nails
E-6000 Glue
Cosmetic Sponges
1/2" wood trim
HERE'S HOW
1. & 2.  Measure, cut and nail the 1/2" trim around the table top about 1/4" above the surface and then fill the crevices with white glue
3. & 4.  Paint the table top and trim with Americana Decor Satin Enamels in Aubergine and the base of the table top and legs in Woodland Green
5. - 8.  Using Americana Acrylics and stencils, create your design on the 4" x 4" tiles with a cosmetic sponge
*I used two yellows for the base, then an orange for the harlequin and finally a light blue for the flower on top
9.  Glue the tiles in place on top of the Lack table
10. - 12. Mix, pour and spread the Famowood Glaze Coat on top of the table making sure that it doesn't spill over the 1/2" trim
13.  Pop the bubbles in the resin with a long arm lighter or a small butane torch and then cover and cure overnight
14. & 15.  Screw on the legs and you're done!
My chic cardboard tile table!

Friday, August 18, 2017

Unicorn Spit Shibori Dyeing

Once I realized that Unicorn SPiT could dye fabric I was off and running!  Lately I've been seeing tons of beautiful home decor upholstered in Shibori dyed fabrics so I decided to investigate.  Shibori has been around since the 8th century and there are many different techniques.  Kanoko Shibori is simple tie dye, Miura Shibori is done by knotting sections of the cloth.  I'm using something called Kumo Shibori which pleated and sometimes bound.  For this project I folded the fabric in different ways and dipped the edges to create the pattern.  I love how interesting each piece of fabric looks.  Remember, something old (Shibori) something new (Unicorn SPiT) something borrowed (your mom's white cotton napkins) and something blue (Unicorn SPiT in Blue Thunder). Oh, and always Make Your Mark!
Hanging around until I decide what to do with them

I'm thinking a funky table setting or pillows
Watch how I did it here! 
STUFF I USED
Small bowls
Water and spray bottle
White cotton fabrics
HERE'S HOW
1.  Mix the Unicorn SPiT with about 30% water
*Unicorn SPiT is very thick so you'll need to dilute it
2.  Mix up several different colors in squirt bottles so that you can use it later
3.  Dampen your fabric with a spray bottle
4. & 5.  Accordion pleat  the fabric every inch and then accordion fold again into a small square
6.  Squirt some of your diluted Unicorn SPiT into a shallow bowl
7.  Carefully dip the edges of your folded piece into the dye
8.  Unfold and let dry
9.  Spray both sides of the fabric with Minwax Lacquer and let dry
*Hand wash fabric by itself in cold water to remove the excess dye when you're ready to wash
I can't wait to try the other colors!
Done!

Tuesday, August 15, 2017

Thrift Store Table Makeover

Have you noticed how much hotel furniture is showing up at thrift stores these days?  This glass table was a bit scratched up, but it was only $15 so I snapped it up and decided to give it a makeover worthy of Kelly Wearstler (my favorite interior designer).  This paint technique is a mix between Italian marbled paper and flow painting and I have a feeling the next table I attempt will be even better than this one.   In the mean time, I'm in LOVE!  Remember to scour thrift stores, recycle as much as you can and always Make Your Mark!
 Rhapsody in blue
I love the bold splashes of color with the intricate marbling around the edges 

Watch how I made it here!
STUFF I USED
Thrift store coffee table
*I used Smoke Grey, Dark Denim, Steel Blue, Seaside Blue & Grey Taupe
Water
Plastic cups
Toothpicks
HERE'S HOW
1. - 3.  Fill each cup with paint, add 10% water and stir
*I used 5 matching colors for this project and I propped the glass table top on wood pieces so that it would be about 1 1/2" above the table
4.  Paint the edges with one of the colors
5. - 7.  Pour each color in a swirl pattern on the table working from the center outward
8.  Carefully angle the table to allow the paint to mix and blend together
9.  Drag a toothpick back and forth every 1" across the table to create a marbled paper look
10.  Paint the table base in Americana Decor Metallics in Silver and let dry
11.  Mix the Glaze Coat according to directions, pout on the table and spread with a sponge brush
12.  Use a small torch or long arm lighter to pop the bubbles, cover and let dry
Assemble and you're done!
So chic!

Friday, August 11, 2017

Solar Twinkling Twigs Chandelier

A few weeks ago a company called Qedertek reached out and sent me some solar powered string lights.  At first I was not impressed, but after a few minutes of playing with them, I was hooked and INSPIRED!  I mean we're talkin' twinkling lights all year long that you don't have to plug in.....EVER!  I finally decided on a twinkling floral chandelier made out of tree branches and faux flowers.  Why not, right?  Who doesn't need twinkling flowers on the patio?  Remember to light up your life (with solar) and always Make Your Mark!


Watch how to make it here!
STUFF I USED
Faux flowers
Transparent tape and glue gun
Brown fabric
Large twig
 HERE'S HOW
1. Tape your Qedertek lights to the branches using transparent tape
 *Make sure that you tape every few inches and that the wires are snug up against each branch
2. & 3. Cut 1" slits on the edge of some brown fabric and rip it into strips
4. & 5. Hot glue the edge of a strip to the tip of a branch and start wrapping the branches to cover the wires while leaving the lights peeking out
6.  Remove the faux flowers from the plastic stems and thread them over each light
7.  Hot glue gems to the underside of a few flowers for some added sparkle
8. Glue a butterfly or faux bird on a branch for some whimsey!
9.  Hang with a ribbon and make sure the solar battery pack is exposed to the sun
My chandelier at night twinkling up a storm!

Friday, August 4, 2017

Painted Inspiration Rocks

The 70's are officially back and rock painting is at an all time high!  It's time to grab some smooth stones (not from your neighbors yard) and go to town with some American Acrylic paints.  These are my absolute favorite paints for rock painting, btw.  Great colors and coverage.  I know I sound like a commercial, but it's true.  I wouldn't steer you in the wrong direction, I promise!  These stones are inspired by vintage Mexican pottery and I can't wait to leave them in the park for people to find.
Remember to use lots of color, find inspiration everywhere and always
Make Your Mark!


Watch how to paint flowers here!
Here's another technique for you!
STUFF I USED
Americana Acrylics (the best for rock painting!)
Smooth river stones
 HERE'S HOW
1. & 2.  Paint a base color on your stones (front and back)
3.  Paint 1/2" flower centers in different colors
4. & 5. Using a round brush paint petals around the centers in different colors
6.  Paint a smaller dot in a different color inside of the original centers
7.  Paint over the petals in another contrasting color around each flower
*I used red with blue, green with blue, orange with yellow
8.  Add small dots to the center of each flower by dipping and dotting the wood end of your brush
9. & 10. Paint leaves with two different greens just like you painted the flower petals
11.  Paint a message on the back of the rock
12.  Coat with 2 coats of DuraClear Gloss Varnish and let dry


Tuesday, August 1, 2017

Make Your Own Paint By Number!

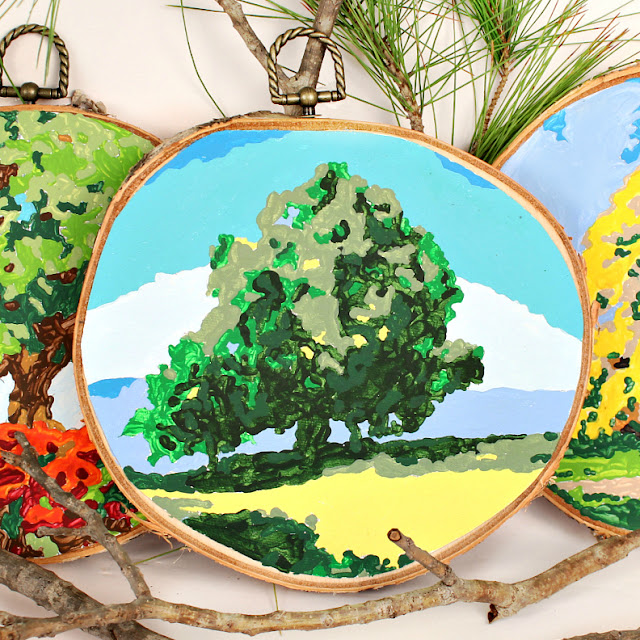
Did you know that you can turn any image into a paint-by-number?  Well you can and it's pretty darn easy, too!  I couldn't decide whether I wanted to paint trees (my favorite) or cosmetics or robots.  As you can see, the trees won my heart!  Just pop your images into PBNify.com and you're on the way.  Now, the success to a good paint-by-number is how you frame it.  Paint by numbers can look super cool or, well.........I'm just going to say it......tacky.  These Walnut Hollow birch wood rounds were the perfect way to mount and frame my trees.   I love the natural bark around the edges!  Now pull out those paints and make yourself a paint by number!  
Oh, and don't forget to Make Your Mark!
 You don't have to be perfect when you're painting trees!


Watch how I did it here!
STUFF I USED
Images of trees to turn into a paint by number
Americana Acrylic Paints (they come in every color you'll ever need)
HERE'S HOW
1.  Head over to PBNify.com and turn your image into a paint by number by following the instructions
2.  You'll want to pick 8-9 colors max or it can get very confusing!
3.  Print your line drawing on printable canvas or heavy duty paper
4.  Press a sheet of paper over a birch round to make a creased shape and then cut it out for a pattern
5.  Center and cut the canvas using the paper pattern
6.  Glue the canvas to the birch round
7.  Using the PBNify palette as your guide, pick out your Americana Acrylics to match
8.  Draw out numbers and squirt some corresponding paint colors to keep yourself organized while you paint
9. - 11.  Now get painting and enjoy yourself!
12.  Screw in a decorative hook when you're done and sign the back Picasso!