Showing posts with label paper ornaments. Show all posts

Thursday, December 7, 2023

Embossed Iridescent Paper Ornaments

Hey friends, great to see you here!  This is an ornament making technique I've been using for years and there are a thousand different ways to make them. You can use photos, Loteria paper or different colors of cardstock. Whatever you have hanging around. It's like math, magic and origami all mixed together. For this particular version I embossed black watercolor paper and then used this incredible pearlescent acrylic ink from Royal Talens that shows up brilliantly on black surfaces. It worked like a charm!  I hope you make some of these fabulous Christmas ornaments - at least your own version!  
Love, Mark!
My trio of Christmas ornaments in 3 of my favorite iridescent colors!
Watch how to make them here or on my YouTube channel here:  https://youtu.be/JyXNLkIBH3A
Here's everything I used for this project:
Amsterdam Acrylic Iridescent Inks: https://www.dickblick.com/products/amsterdam-acrylic-ink/ SIZZIX Big Shot Embossing Machine: https://bit.ly/3Z5ILQS Van Gogh Black Watercolor Paper: https://bit.ly/3R4fVx1
I used a drinking straw inside for the structure but you could use a rolled paper straw
This stuff is magic!
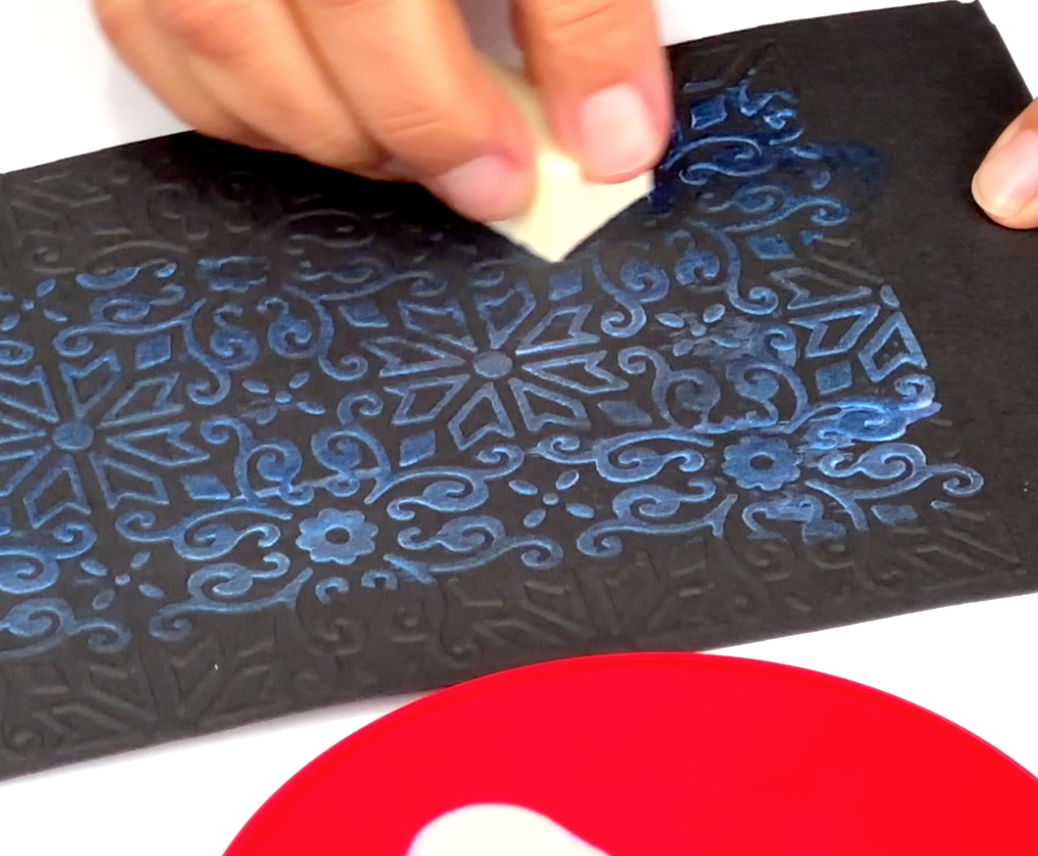
Wiping it over the embossing and it just appears and the most beautiful way!
I'm obsessed with embossing anything and everything. I love my Big Shot from Sizzix and am thinking about getting a much larger version!

Merry Christmas!  Love, Mark!


Friday, November 25, 2016

Easy Paper Christmas Ornaments!

It took me a while, but I finally designed a new paper ornament to share with you!  You can cut it from one sheet of 8 1/2 x 11 cardstock or scrapbook paper and embellish it any way you like.  I added bells and beads but you could use a tassel or another tiny ornament.   Enlarge the pattern and you have different sizes.  Even the kiddos will love making these.  Remember to have fun, DIY with the family and always Make Your Mark!
Hanging in my neighbor's tree
I think we're going to hang these in a window!

Watch how to make them here!
STUFF I USED
Christmas scrapbook paper
Needle nose pliers and large safety pin
Beads, Bells, Pailettes
Straws and wire
HERE'S HOW
1. & 2.  Trace the pattern on the card stock and cut
3. 4. & 5.  With a large safety pin, poke holes in the center, at the end of each petal and in the center of two paillettes
6.  Cut a piece of wire about 6" long and bend a loop on one end
7.  Cut drinking straws about 2 1/4" long
8.  Thread a bead, then paillette and then the center of the cut paper pattern side facing the bead and paillette
9. Add your straw
10. Going around one by one, thread the tip of each petal on the wire
11. Add another paillette and bead and then cut and bend another loop to secure it
12.  Finish with bell on one end and a ribbon on the other so that you can hang it
Merry Christmas!

Saturday, February 14, 2015

Party Balls 2!

Two years ago I figured out how to make party balls from old magazines.  It took tons of trial and error to get them just right!  Well, I've figured out another design for you and it's the perfect way to get rid of that stack of magazines that has been cluttering up your living room.  Now, I know these really look like wheels or disks, but I'm just going to call them Party Balls 2....I think it just sounds more fun, don't you?!
Hang them in the trees!
Might even fool the bees!

The original Party Balls video
Watch the short Party Balls 2 video tutorial here!
YOU'LL NEED
Magazines
Hot glue gun
Ribbon
Scissors
Printout of pattern (below)
 Print and cut the pattern in thin cardboard
*I like to use cereal box cardboard
Trace it on a stack of magazines
Cut out 56 pieces per party ball
On the first piece, add a dot of glue in the 4 areas  pointed out with the red arrows
Place another cut out on top of the glue
Next, add glue in the 3 areas pointed out with the red arrows
Continue alternating 4 dots of glue and 3 dots of glue until you've use all 56 pieces
Glue the cardboard on the top of the stack
Open the pages and glue the cardboard to the other side
Punch a hole in the cardboard and hang from ribbon
Print on regular 8 1/2 x 11 copy paper. 


Saturday, December 13, 2014

Recycled Magazine Snowflake Ornaments

I know, I know!  These look like those huge tissue paper roll thingies that you see all over Pinterest.  I'm happy to say that these are much smaller and more delicate and perfect for your holiday decorating. Plus, you don't have to go through 40 rolls of tp to make them.  All you'll need are some old magazines and a few very basic supplies.  Grab the kids and make a ton of these for your tree. 
Merry Christmas!

I went a little nuts making these.... It's like craft meditation.
Watch the video tutorial here!
THINGS YOU'LL NEED
Wax paper
Glitter
White glue
Magazine pages
Scissors
Paintbrushes
Pencil
Thin ribbon
 Cut magazine pages in half (side to side, not top to bottom)
Roll one sheet around a pencil and add another sheet when you get to the end
*This will make your tubes nice and thick
Glue the end of the paper down 
Cut the tubes into 1/2" long pieces
You'll need about 8 tubes to make one ornament
Lay out wax paper
 Squeeze some glue on the edge of your wax paper
Dip the pieces in one by one and build your snowflake
When dry, paint with the gold Americana Multi-Surface Satin
Brush glue on the edges and sprinkle with glitter
Add a ribbon through one of the ends and hang on your tree!
Magical!