Tuesday, January 9, 2018

Underwater Dresser

I saw this sad little dresser at a thrift store just begging me to take him home.  Seems the broken tracks on the drawers were a "no deal" for any other potential buyer, but not for me!  A little glue, a few nails and he was good as new!  Recently I was inspired by a beautiful two-tone desk and decided to give the technique a try with a few little differences.  I added hints of gold to highlight the edges and details and compliment the hardware.  What a difference a little bit of paint makes, right!  Remember to always give your old furniture a second chance with a coat of paint.  Oh, and always Make Your Mark!
 Styled on the back porch and waiting for a room inside my house!
The glorious gold details!

Watch how to make it here!
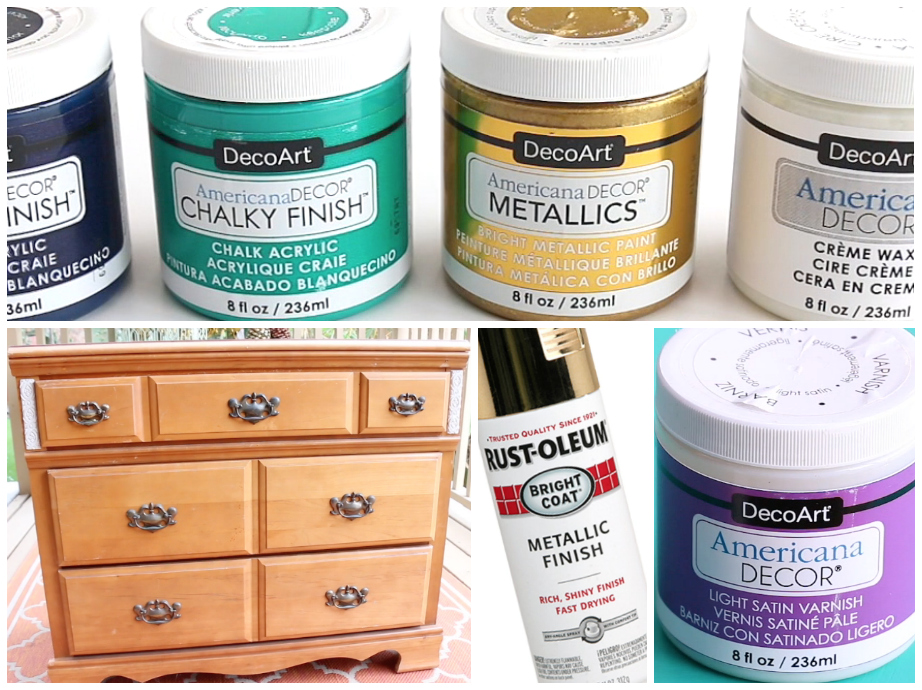
STUFF I USED
Thrift store dresser
 HERE'S HOW
1. Remove the hardware
2. Paint the edges and details in metallic gold and let dry
3.  Paint over the metallic gold with the clear cream wax and let dry
4.  Paint the top 1/3 of the dresser in Adirondack chalky finish
5.  Blend the lower part of the Adirondack area with Honor chalky finish
6.  Continue painting the lower half of the dresser in Honor
7.  Using a rag or fine sandpaper, rub the areas that were painted with wax to expose the metallic gold
8.  Spray paint the hardware in bright metallic gold
9.  Seal the chalky finish with a light satin varnish
So in love!

Friday, January 5, 2018

Big Blue Marble Table

I'm all about happy accidents.  For example, THIS TABLE!  Originally I was trying for the granite effect made popular by the inventor of Unicorn SPiT, Michelle Nicole.  I failed miserably!  Not sure what went wrong, but I'm pretty happy with the results anyway.  Just goes to show you that sometimes you just have to take what you get and sometimes what you get is just lovely!  Remember to experiment without fear and to always Make Your Mark!
My Big Blue Marble coffee table!
It reminds me of the earth
  Stacked with my yummy treasures
Watch how to make it here!
STUFF I USED
Spray bottles
Thrift store table
 HERE'S HOW
1.  Mix 1 part Unicorn SPiT to 4 parts water in a spray bottle
*I used Dragon's Belly, Blue Thunder, Zia Teal & White Ning for this table
2.  Spray streaks of Blue Thunder on the table
3.  Spray streaks of Dragon's Belly across the table
4. & 5.  Next spray Zia Teal and finally White Ning
6.  Without moving the table, let the colors blend and dry overnight
7.  Carefully flip the table top, clean the drips and then spray paint the back gold
*The gold with peek through where the Unicorn SPiT separated on the glass
8.  Prepare the Glaze Coat (I used one 1-pint box for this table)
9. & 10.  Elevate the table about 1" on some wood blocks, evenly pour out the Glaze Coat and spread it with a sponge brush
11.  Pop the bubbles with a small torch or long arm lighter, cover and let cure overnight
12.  Spray the table base in a matching color and start redecorating your living room!
The world in my living room!

Wednesday, January 3, 2018

Embellished Candles with Marabu

It's winter (even here in Los Angeles) and I've been burning candles every day to make my house feel more comfortable and homey while it's chilly outside.  Most of my candles are white pillars, so when Marabu sent me their Candle-Liners, I went a little crazy decorating them.  Candle-Liners are water based, wax paints that melt just like candle wax so you can actually paint ON your candles.  How awesome is that?!  I thought so, too.  At first I tried painting on the candles, but I just couldn't figure out a design I was happy with.  Instead, I printed some vintage images on tissue paper and that's when the magic happened.  I think they're gorgeous.  A terrific personalized gift idea, too.  This is my year to try new projects, like making candles, and I hope you challenge yourself to try something new in 2018.  Whatever you try, remember to Make Your Mark!
I love how these look together!
So much drama!    

 
Watch how to make them here!
STUFF I USED
White pillar candles
Tissue paper & copy paper
Hair dryer
White school glue
  
HERE'S HOW
1.  Press the tissue paper perfectly flat using the no-steam setting
2.  Cut the tissue to copy paper size (8 1/2" x 11") and then carefully glue the very edges to a piece of copy paper
3.  On your home computer, print out the images in the size you want on the tissue paper
*Let the ink dry for a minute
4.  Carefully cut around each image
5.  Using tiny dabs of white school glue, adhere the image to the candle
6.  Using a blow dryer, carefully warm the wax enough to allow the
 tissue paper to adhere to the candle
*Don't get the wax, too hot.  Only a little at a time!
7. - 9.  Embellish the images with Marabu Candle Liners
*Marabu Candle Liners dry a bit darker than the color and the 
metallic gold looks like liquid gold when it's dry.
In love!
 Happy New Year!

Tuesday, December 19, 2017

New Year's Eve Centerpieces

Some dollar store wood letters and glitter and you're half way to having an amazing holiday centerpiece for just a few bucks!  Grab a number 9 and you're ready for next year, too.
Happy Holidays everyone!
Don't forget to Make Your Mark!
So much JOY! 
Are you ready for 2018?
Watch how to make them here!
STUFF I USED
Americana Decor Metallics and Silver and Antique Brass
Dollar store wood pieces
Various Christmas decorations and ornaments
Gold and Silver Glitter
HERE'S HOW
1.  Glue the letters to the base with E-6000 Glue and let dry
2. & 3.  Paint them with Americana Decor Metallics in Silver and Gold
4. & 5.  Add glue and then glitter to the letters and numbers
6.  Decorate them with cute ornaments and garland
 Happy New Year!
Joy to the world!

Friday, December 15, 2017

Paper Tile Mirror

Teal, neon pink and olive green is seriously one of my favorite color combos!  It reminds me of Mexico in the 1960s and I have no idea why.  DecoArt makes this sassy neon pink paint that I would eat if I could.....but unfortunately I can't.  Instead I used it to create the eye popping paper tiles for a little bathroom mirror project.   I cut my own mirror frame, but you could use a store bought frame for this project.....Totally up to you!  When coated in Famowood Glaze Coat, it's protected and ready for endless water splashes and hair spray!  Faux tile projects are soooo much lighter than using real tile and you can design your own in ANY pattern.  Be creative my sweet friends and always remember to Make Your Mark!


Watch how to make it here!
STUFF I USED
1/2" plywood and mirror
12" x 12" Gel Press
Drill, Jigsaw, Sander
Large stencil
Americana Decor Satin Enamels in Woodland Green and True Teal
Allure Dimensional Design Adhesive Paint (in Gold Leaf)
Extreme Sheen in 24K Gold
Americana Acrylics in Peacock Teal & Sizzling Pink Neon
HERE'S HOW
1. & 2.  Cut & sand a frame in 1/2" thick plywood
 *Mine was 18" x 24" with a 5" border
3. & 4.  Paint the frame with Americana Decor Satin Enamels in Woodland Green and then edge in True Teal to give it some dimension
5.  Stencil over the entire frame with 24K Gold Extreme Sheen using a Fleur Medallion stencil
6.  With a brayer, spread 24K Extreme Sheen on your Gel Press and then add some 
Sizzling Pink Neon
7.  Press your cardstock onto the Gel Press to transfer the paint
8. - 10.  Spread Peacock Teal on the Gel Press, place the Fleur Medallion stencil and then transfer the stencil the the previously Gel Pressed pages
11. & 12.  Cut the pages into 4" x 4" tiles and then add dimension to the designs with Allure Dimensional Design Adhesive Paint in Gold Leaf
13.  Glue the tiles to the frame with Americana Decoupage
14.  Mix the Famowood Glaze Coat and pour it over the frame following all of the instructions for mixing and popping bubbles
*Cover and cure overnight
15. & 16.  Sand the back opening flat and then glue the mirror in place
 The pink just pops!
Always Make Your Mark! 

Tuesday, December 12, 2017

Iridescent Mermaid Ornaments

My dad owned a car lot when I was about 6 and my brothers and I would have to spend almost every Saturday with him so my mom could have a (much needed) break from us!  One of the things I remember vividly was the oil pan in the main garage.  I thought the swirls of color on top were mesmerizing and my entire life I've been trying to replicate those iridescent colorful swirls.  I think I might be getting closer with this iridescent mermaid ornament project.  I love all of the blended metallic colors together!  Have a wonderful Christmas and don't forget to Make Your Mark!

My iridescent trio!

Watch how to make them here!
STUFF I USED
Lace or doilies
Plastic ornaments
 HERE'S HOW
1.  Cut the lace into pieces
2. & 3.  Soak them in Americana Decoupage and glue them to the ornaments
4. Paint the entire ornament in Gold Extreme Sheen 
5. - 7.  Start brushing on different colors of Metallic Lustres
8. Glue on small rhinestones with E-6000 Glue
9.  Add a ribbon to hang the ornaments
Merry Christmas!

Tuesday, December 5, 2017

Coco Inspired Mini Piñata Ornaments

Have you seen the beautiful animated Pixar movie Coco yet?  It's a MUST see!  A wonderful story of family, following your heart and of the Mexican holiday, Day of the Dead.   The movie inspired me to make these mini sugar skull piñata ornaments for Christmas.  Some of them are empty and a few of them are filled with treats to give to my crafty friends.  A little cardboard and some Oly-Fun made these sturdy enough to use for years to come!  I cut my sugar skulls on my Cricut Maker, but you could print some out and just glue them on top.  I'm including my Sugar Skull graphic & cardboard patterns here:  http://www.markmontano.com/p/blog-page_80.html
Have an awesome holiday and don't forget to Make Your Mark!
Ready to hang on my tree!
A must see movie!

Make some mini trees, too!

Watch how to make them here!
STUFF I USED
Cardboard
Americana Acrylics
Glue Gun
Cricut Maker 
Candy and small toys

HERE'S HOW
1. & 2. Cut 2 skulls and 2 strips of 1 1/2" wide cardboard
3.  Curve the 1 1/2" wide strips along a table edge
4.  Glue the 1 1/2" strip along the edge of one of the cardboard skulls
5.  Fill with candy and toys and then glue the 2nd cardboard skull on top
6.  Paint the piñata in a color that matches the fringe you will be using
7. & 8. Cut 1" long strips of Oly-Fun Craft Material and then fringe every 1/4" along one side
9. & 10. Starting at the chin, glue strips of fringed Oly-Fun up the cardboard piñata
* Use one color or several
11. - 13. Upload the sugar skull graphics into your Cricut Maker and cut them in heavy card stock
*You can also print out the graphics and use them by themselves OR print out a sugar skull and color it with markers or crayons
14.  Glue the card stock sugar skull on the piñata
15. Glue Oly-Fun flowers on the top
16.  Try making a mini Christmas tree piñata and decorate it with pom poms
Feliz Navidad!
Love these so much! 

Friday, December 1, 2017

Vintage Bird Ornaments

Grab some cardboard and some old book pages and make these super cute vintage bird ornaments! Copy a book page if you don't have a damaged book you can use.  Most of what you need to make these ornaments you probably already have, too!  Use curling ribbon or string if you don't have satin ribbon or use scrapbook paper over the cardboard bases if you don't have a stencil. So many variations and Christmas is right around the corner.  I'll bet your friends would love a couple, too.  Happy holidays and always Make Your Mark!


Watch how to make them here!
STUFF I USED
Cardboard
Wire
Small jingle bells
Americana Acrylics
M Squared Stencils
Allure Dimensional Design Adhesive Paint in Glitter
Cosmetic sponges (for stenciling)
Book pages
 HERE'S HOW
1.  - 3.  Trace, cute and glue together 3 cardboard birds
4.  Cut book pages 1" larger than the bird pattern (all the way around) 
5. - 7.  Mist with water and decoupage to each side of the bird making sure to cut slits so that the edges fold over to the other side
8. - 9.  Stencil and embellish with paint and glitter
10.  Bend a loop on a 5" piece of wire
11.  Push it through the center of the bird and bend a loop on the other side
12.  Hand a bell on the bottom with a jump ring and tie a ribbon on the top to hang
Bird pattern
Cut 3 in cardboard
Merry Christmas!