Tuesday, June 12, 2018

Pom Pom Placemat Purse

Hit the 99c store for colorful, round placemats perfect for making these taco-shaped summer clutches!  At first I wasn't quite sure how this was going to happen, but stitching on the zipper was actually quite easy!  The key is using a separating zipper and making sure it measures 1/2 way around the placemat.  Once the zipper is stitched in, the design is all up to you.  I opted for colorful yarn pom poms and a very funky tassel for the zipper pull,  but you could paint, stencil or embroider on your bag....It's easy to personalize them for your own style.  I know you already have a million ideas, too!  
Just have fun and remember to Make Your Mark!
Julie showing off her new bag!
Mama's got a brand new bag!
Taco-rific! 
Watch how to make it here!
STUFF I USED
Round Placemat from Dollar Tree
Colorful Yarn
Clothespins
Sewing Machine
Separating zippers
PattieWack Pom Pom Maker and Tassel Maker
HERE'S HOW
1.  Separate the zipper and stitch 1/2 of it around 1/2 of the placemat
2.  Tuck the excess toward the inside of the back and stitch down
3. Zip the other side of the zipper to the stitched half for placement
4. Match the ends so that the zipper matches
5.  Starting at the end, tuck the excess and stitch the other half of the zipper to the 
other half of the placemat
6. Use either a matching zipper or contrasting zipper...Up to you!
7. Wrap the pom pom maker about 75 times and then tightly tie the middle of the bundle
*I made 5 in 5 different colors for this bag
8.  Clip the ends and remove from the pom pom maker
9.  Trim the longer pieces to make a perfectly round ball shape
10.  Wrap the tassel maker (with 5 different colors of yarn) about 15 times
and then tie a knot at the very top
11.  Tie more yarn around the neck of the tassel
12. Clip the bottom and remove from the tassel maker
13. & 14.  Glue the pom poms along the edge of the bag with E-6000 Fabri-Fuse and clamp 
in place with clothespins while they dry
15.  Tie the tassel to the zipper pull
16.  Wear in style and let everyone know you made it!
 Style in the BAG!
HAPPY SUMMER!

Friday, June 8, 2018

Cardboard Mosaic Tile Trays

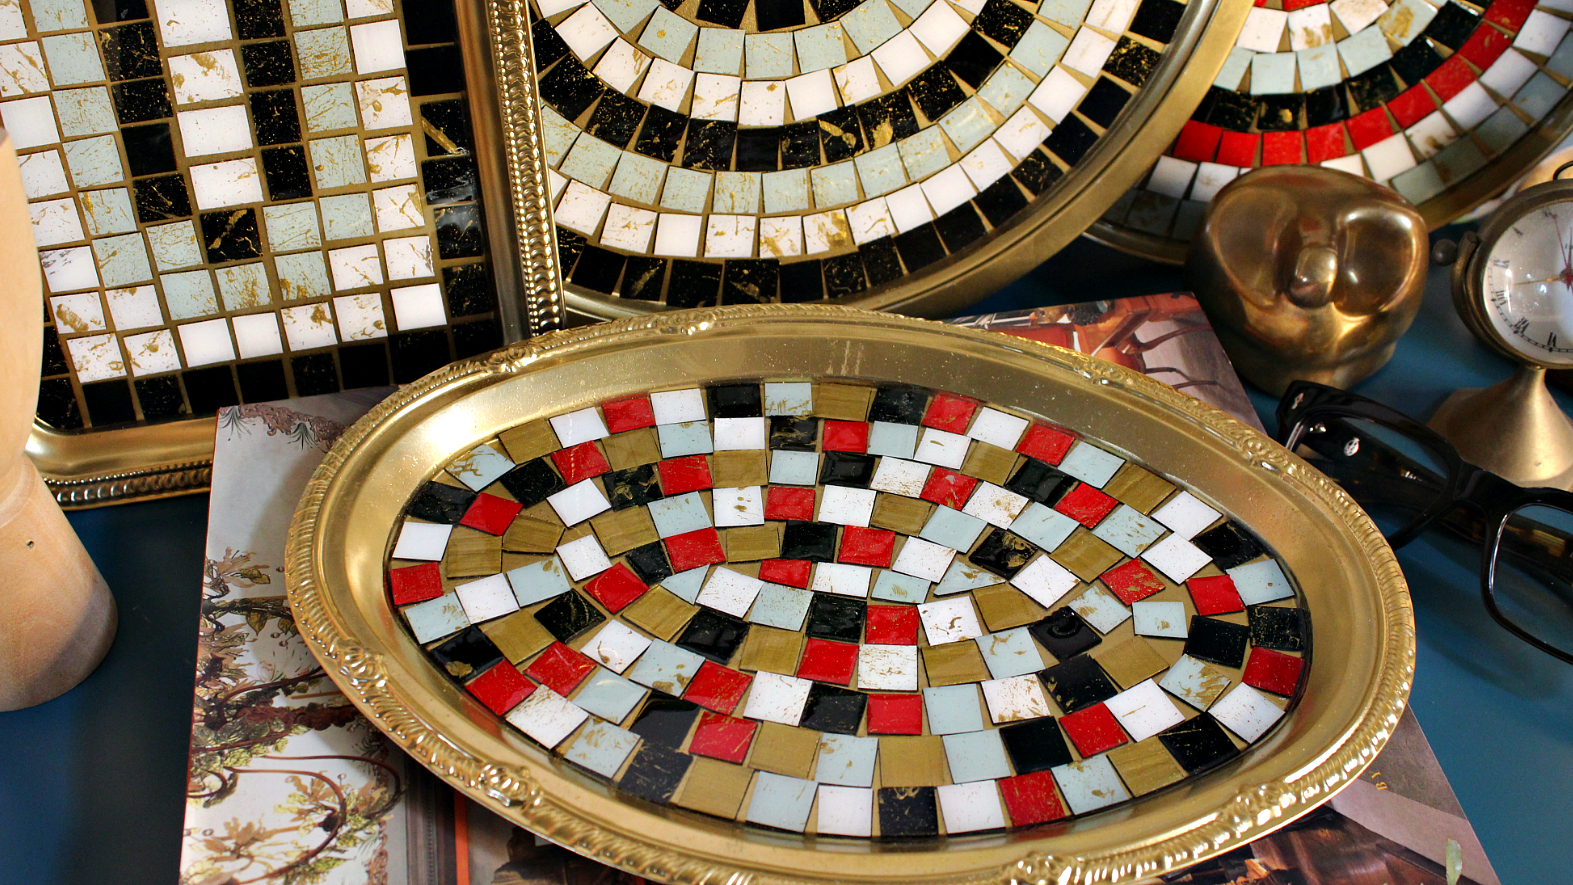
I have a huge collection of mosaic trays from the 1950s thru the 1970s.  When I was in high school, going to thrift stores was my thing!  Still is actually.  Since I've been on a cardboard tile kick this past year I thought I'd try my hand at making some tile trays.  Wow do I love the way these look. I made one for my eyeglasses and another for my watches and rings.  They are the perfect catchall.  Make them in the colors you like to match your house and put them everywhere!  Tray the force be with you!  Oh, and don't forget to Make Your Mark!
 Just a few of my new pieces
 Got the oval metal tray at Dollar Tree!
Pizza tins are perfect for this project!
Watch how to make them here!
STUFF I USED
Americana Decor Outdoor Living paints
Splatter Brush (you could use an old toothbrush)
Dollar Store Metal Trays
Cardboard
HERE'S HOW
1. Paint the cardboard pieces in your favorite colors
2.  Splatter them with Vintage Brass
*I used a splatter tool, but you could use your thumb and an old toothbrush
3. & 4.  Draw a 1/2" grid on the back of the painted cardboard pieces and 
cut along the grid for 1/2" tiles
5.  Spray the metal trays in metallic gold and let dry
6.  Glue the tiles to the inside of the tray with E-6000 Glue
7. & 8.  Mix the Glaze Coat according to directions and pour inside
the tiled trays making sure not to get it on the edges
*Only pour on the tile and let it run to the sides
9.  Gently distribute the Glaze Coat with a sponge brush making sure
that it's even around the edges
10. Pop the bubbles with a small torch or long arm lighter
11.  Cover and let cure overnight
12. Display!  I use mine for my eyeglasses and watches

 Tray chic!
Make something, OK!

Tuesday, June 5, 2018

Green Faux Marble Table

One day I will have 11 living rooms so I can showcase all of my favorite coffee table DIYs!  This one I'm keeping even if I have to rent storage space for it!  I decided to jump on the flow painting trend AGAIN and create a faux marble, malachite looking table on an old thrift store table top I had in my stash.  Since I didn't have a base, I created one with some simple wood pieces.  That said, if you find a table with a base that works, skip the base building part and just get to the painting!  Remember to try everything and always Make Your Mark!
 I'm in LOVE!
 Might be too pretty to fill with my stuff!
On second thought!
Watch how to make this table here!
STUFF I USED
Americana Multi Surface Satins in Greens, Metallic Gold, Cream & Black
2" Wood Screws
1" x 4" Pine Boards
1" x 15" Wood Round
Thrift Store 36" Table Top
Tacklife Sander, Drill & Jigsaw
 HERE'S HOW
1. - 3.  Measure, mark, cut & sand eight 19" long 1" x 4" pine boards
4.  Mark the 1" x 15" wood round into 8 equal pie pieces
5.  Glue the eight 19" pine boards on each of the sections with Amazing Goop II Max
and let dry
*Prop the boards upright with soup cans so they don't move while they dry
6. & 7.  When the boards are dry, flip the table, drill through the base into the pine boards and then screw each board to the base with a 2" wood screw
8.  Paint the entire base with Americana Decor Metallics in Vintage Brass
9. & 10. Fill plastic cups with Americana Decor Metallics in your color scheme
*I used Green Beret, Turf Green, Leprechaun, Vanilla Shake, Gold & Black Tie
11.  Paint the edge of the table top in Leprechaun (or any color you want)
12.  Drip the paints around the table top one by one
13.  Tilt the table to get the marbled effect until you're happy 
14.  Edge the table with a metallic gold paint marker when it's dry
15.  Paint the edge of the table with more Vintage Brass
16.  Mix a 1 pint box of Glaze Coat 2 part epoxy resin, pour it on the table top and distribute with a sponge brush
17.  Pop the bubbles with a long arm lighter OR a small torch
*Cover and let the resin cure over night
18.  Using a generous amount of Amazing Goop II Max, glue the table top on top of the 8 wood pine pieces and let dry
Green and gorgeous!

Sunday, June 3, 2018

Iridescent Dresser Makeover with Unicorn SPiT Sparkling

If you follow me then you know I'm obsessed with anything that looks iridescent or like an oil slick.  Lately I've been experimenting with the new Unicorn SPiT Sparkling from Eclectic Products and I'm pretty close to figuring the whole iridescent, oil slick mystery!  The Unicorn SPiT Sparkling  looks absolutely magical sponged over flat black and I am now convinced that very soon, everything in my house will be painted like this!   Remember to give your old furniture a makeover before you decide to get rid of it.  Also, don't forget to Make Your Mark!
 Love the shimmer!
The green really does it for me!

STUFF I USED
Thrift Store Nightstand
Brass Drawer Pulls
Old sponges
Rust-Oleum Clear Lacquer
Krylon Flat Black Spray Paint
 HERE'S HOW
1.  Clean the dresser to make sure it's free of dirt and dust
2.  Unscrew the old handles
3.  Spray paint the entire dresser in flat black and let dry
4. - 6.  Dab the Unicorn SPiT Sparkling on one color at a time starting with Golden Gosling, Sapphire Swift, Violet Vulture, Lavish Lovebirds and finally Starling Sasha
*Really dab it on!
7.  Coat the entire dresser in 3 coats of clear gloss lacquer when the Unicorn SPiT Sparkling is dry
8.  Use a gold paint marker to accent the edges
9.  Add new brass handles to bring it all together
Done!
Magical, Galactic, Oil Slick, Iridescent!
Enjoy!
xo, Mark

Tuesday, May 29, 2018

Colorful Dollar Store Frames

I finally bought a stack of the flat wood frames I keep seeing on every trip to the 99c store!  I admit that they sat around for a week before I finally figured out what to do with them.  I grabbed a little funky scrapbook paper and paint and created a wall filled with some serious color & happiness.  I'm sure you have everything on hand to make these, so grab the family and get making.  They're only a buck and not every craft project has to cost a fortune, right!  
Now get out there and Make Your Mark!
 My stack of happiness!
So much color!
Where do I start?
Watch how to make them here!
 STUFF I USED
Americana DuraClear Gloss Varnish
Americana Acrylics
Fun scrapbook paper
Americana Decoupage
Dollar store wood frames
 HERE'S HOW
1.  Trace around the frame on the scrapbook paper
2.  Cut out and make sure it fits perfectly
3. & 4.  Paint around the frame edges on the front and paint the entire back in a matching color
5.  Add Decoupage medium to the front of the frame and adhere the cutout
6.  Add two coats of gloss varnish when dry waiting 10 minutes in between coats
Can't wait to fill these with black and white photos!

Tuesday, May 22, 2018

Magazine Gel Press Jewelry

Grab your Gel Press and some old magazines and go to town transferring images for everything from journal pages to jewelry!  These Gel Pressed jewelry pieces might just be big enough for Iris Apfel!  Today I'm sharing how to make your own beads and print funky images on a Gel Press.  Go to town with technique and use plenty of color!  Remember, be a creative wild child and always 
Make Your Mark! 


Watch how I made the jewelry here!
STUFF I USED
Drill press for a rotary tool.....This is optional if you're good with a drill OR have your own wooden beads to cover with images
Americana Acrylics
Americana DuraClear Gloss Varnish & Matte Decoupage
1/2" x 1 1/4" wood trim
Elastic beading thread
Wood bangles

HERE'S HOW
1. - 3.  Cut the 1/2" x 1 1/4" trim into 1" long pieces and sand them so they're smooth
4.  Drill two holes through each 1" bead
5.  Paint the wood bangles and beads with Americana Acrylics in your favorite colors
6. & 7.  Spread DecoArt Media Fluid Acrylics on a Gel Press and press down a high contrast magazine page for a few seconds
8.  Carefully remove the magazine page to see a reverse image on the Gel Press
*You'll get the hang of it! 
9. & 10. Spread a lighter color over the image on the Gel Press and then remove the image on paper
11. & 12. Cut your favorite parts of the images to decoupage on the beads and bangles
13. & 14. Coat the beads and bangles with DuraClear High Gloss
15.  Thread the beads with two strands of elastic thread
16.  Tie two knots and hide the knots inside one of the beads
Wearable Pop Art!
Like wearing candy!

Friday, May 18, 2018

Resin and Yarn Bowls DIY

Did you ever make a yarn bowl when you were a kid?  Just a little glue and yarn and a plastic bowl and you were good to go.  The trouble with those 3rd grade yarn bowls is that you can't really put anything inside of them and after about a month, they're back to being a pile of crunchy yarn.  Still, I think they're just beautiful!  I decided to see if I could add a little epoxy resin to the mix, just to see if they would be sturdy enough to fill with fruit.....Guess what?!  It worked like a charm!  A little epoxy resin and these yarn bowls are hard as a rock.  Remember to kick it up a notch and always
Make Your Mark!
 Adora-bowl!  Get it?!
My blue period!
Sturdy enough to fill with oranges, apples or lemons!
Watch how to make them here!
STUFF I USED
Sponge brush
Yarn in different colors
Water
White school glue
 HERE'S HOW
1.  Mix white school glue with a little water and mix
2.  Cut bundles of yarn about 24" in length
3.  Saturate the yarn (a few strands at a time) in the glue
4. & 5.  Strain the yarn between your fingers and artfully wrap around the silicone bowl
6.  Dry in the sun
7.  Mix the Glaze Coat according to directions
8. Sponge all of the yarn with the Glaze Coat until it's soaked 
and then cover while it cures over night
9.  Remove the yarn bowl from the silicone bowl and clip the excess resin drips
Done!
 Ready for summer!
Pretty in pink!
Crazy colorful!