Tuesday, November 27, 2018

Boho Renaissance Ornaments

These ornaments are inspired by Shabby Vintages Studio.  Check out her work on Pinterest!  For mine I added tons of color,  seed pearls, glitter and some favorite images to make them fit my aesthetic.  I named them Boho Renaissance Ornaments only to realize later that I have a Victorian image mixed in...Things happen.  It's the wild west when you're making Christmas ornaments.  Once again I used my  re•design with Prima molds and the basswood round ornaments from Walnut Hollow.  Like all of my projects, you can use the images you want.  I'd love to see a set with vintage family photos.  Fill your tree with handmade ornaments and don't forget to Make Your Mark!
Renaissance with a dash of Victorian!
Pearls and snow glitter make them even more Christmas-y!

Watch how to make them here!
STUFF I USED
re•design with Prima molds
Birch Ornaments from Walnut Hollow
Renaissance images
E-6000 Glue
Renaissance images
Print to size
HERE'S HOW
1.  Trace around your basswood round ornament on the back side of the image
2.  Decoupage the image onto the basswood round
3.  Stencil over the image with Matte Metallics in Vintage Brass to give it an illuminated feel
4.  Sponge around the edges of the ornament with more Matte Metallics in Vintage Brass
5. Mix the 2 part plastic and fill the re•design with Prima molds
*The 2 part plastic hardens in about 15 minutes or so
6.  Wipe off the residue on the molded pieces and paint with Matte Metallics in Vintage Brass
7.  Dry brush the pieces with different colors of Americana Multi-Surface Satin Paint
8.  Hot glue a thin ribbon on the top of the ornament and a tassel at the base of the ornament
9. & 10.  Sandwich the ribbon and tassel top between the ornament and painted molded pieces
11.  Using white glue, add seed pearls to the edges
12.  While the glue is still wet, sprinkle with snow glitter and let dry

Happy Christmas!

Tuesday, November 20, 2018

Corrugated Cardboard Ornaments DIY

Recently I got some corrugated cardboard in some packaging and like that weird kid who only cares about the box and not the gift, I went crazy!  So crazy I bought another huge roll of it on Ebay to keep making things with it.  My first project was these ornaments...I LOVE them!  Just roll them up with a little glue, paint and then glitterize them.  So easy!  Kids will love making them, too. I used DecoArt Extreme Sheens because they come in bright, metallic colors.   Definitely grab a few next time you're at the craft supply store.  Remember to use up that holiday cardboard and always 
Make Your Mark!
Just a few of my shiny new ornaments!


Watch how to make them here!
STUFF I USED
DecoArt Extreme Sheen
Wire
Metallic Gold Pipe Cleaners
Corrugated Cardboard
Glue Gun
DecoArt Craft Twinkles
Pattern for Ornaments
Print out for reference, but you'll need to cut your patterns 
on larger paper.  I used a large manilla folder for
my patterns.
HERE'S HOW
1. & 2.  Trace  & cut your pattern from corrugated cardboard
3.  Starting from largest piece to smallest, Roll and hot glue them together
4.  Paint them with DecoArt Extreme Sheen paint and let dry
5. Glitterize them with DecoArt Craft Twinkles
6. Add a wire to hang them from the top using a dab of hot glue
Optional:  Add a pipe cleaner at the top for some extra sparkle

Happy Holidays!

Friday, November 16, 2018

Boho Heart Ornaments DIY

My tree is all about bright colors this year and these soft, boho heart ornaments are just the ticket to make it POP!  I used neon colors on my Gel Press and embellished them with glitter Allure from 
E-6000.  I'm excited to be bucking tradition this year and going nuts with a tree that is filled with things that make me feel the joy of the season.  I say, do what makes you happy and
don't forget to Make Your Mark!  


Watch  how to make them here!
STUFF I USED
Gel Press
Cotton fabric
Sewing machine
Poly-fil Premium Polyester Fiber Fill
Allure Dimensional Design Adhesive Paint in Lime Glitter, Metallic Orange and Pink
Americana Acrylics in Sizzling Pink, Pink Explosion, Scorching Yellow, Torrid Orange
Electric Blue, Laguna Blue Aqua Sky
Pom poms
Beads from BeeBeeCraft.com
HERE'S HOW
1.  Dot your Gel Press with Americana Acrylics in Sizzling Pink, Pink Explosion, Scorching Yellow and Torrid Orange
2.  Distribute evenly with your brayer
3. Press & pull the cotton fabric
4.  Dot the Gel Press with Americana Acrylics in Electric Blue, Laguna Blue & Aqua Sky
5.  Spread evenly
6.  Place a stencil on top
7.  Press the fabric on the Gel Press again and transfer the stencil by
gently pressing the fabric on the stencil
8.  When dry, cut two hearts from the Gel Pressed fabric
9.  Stitch them using 1/4" seam allowance making sure to leave a 2" opening
10.  & 11. Stuff with Poly-fil and stitched closed
12.  Wrap a tassel maker with matching yarn
13.  Tie the bundle at the top and a contrasting yarn around the neck
14.  Slip off the tassel, cut the loops and trim
15.  Stitch a tassel, pom pom and bead to the tip of the heart
16.  Embellish with Allure Dimensional Design Adhesive Paint

  Bo-ho-ho-ho-ho! 

Tuesday, November 13, 2018

Cardboard Loteria Ornaments

I'm all about having a colorful, Mexico/Boho inspired tree this year and these Loteria House Ornaments are going to be perfect for it!  I've included all of the printouts I used AND the pattern for the house so all you have to do is print out the images, cut out some cardboard and start gluing!  Try using photos of your family or pets or even vintage Christmas cards for this project.  It's up to you and your amazing creativity!  Remember to make a few of these ornaments for your friends...Oh, and don't forget to Make Your Mark!
 Use any kind of image you want!
The Allure Glitter looks amazing on these!

Watch how I made them here!
STUFF I USED
E-6000 Spray Adhesive
Wire & Craft Bells
Allure Dimensional Design Adhesive Paint
Loteria Images (below)
Cardboard
Glue Gun
Papel Picado Images (below)
HERE'S HOW
1.  Trace and cut the patterns in cardboard (below)
2.  Score along the score lines
*This makes bending them into shape so much neater
3.  Glue the pieces together
4. & 5.  Cut and glue the loteria images to the sides of the house using E-6000 Spray Adhesive
6. & 7. Cut and glue the papel picado triangles to the roof and base
8.  Poke a hole in the exact center of the base
9.  Glue the pieces together
10.  When dry, accent the edges with Allure Glitter or Gloss in matching colors
11.  Attach a bell to the end of a 5" long wire and thread it through the house from the bottom 
through the point on the roof
12.  Bend a loop on the roof and hang
Print these for the sides of the house
Print for the roof and base of the house
Print on standard size paper

Feliz Navidad!


Friday, November 9, 2018

Magical Origami Star Ornaments

These origami stars are easy to make and you can use them for the holidays in several different ways!  I'm going to hang some on my tree and turn some into Christmas cards.  Use patterned paper or stencil them like I did.  Pop a little gem in the middle and you have something super special.
Let your star shine this holiday season and don't forget to 
Make Your Mark! 
 You're a star!
 Book pages and kraft paper
Add a dab of glitter or a gem in the center....Easy peasy!
HERE'S WHAT I USED
Flat back gems
DecoArt Matte Metallics in Vintage Brass
Kraft paper & book pages
Tracy Moreau Snowflake Stencil
Allure Dimensional Design Adhesive Paint in Gold Leaf and Silver Glitter
Americana Acrylics in White
Watch how to make them here!


Tuesday, November 6, 2018

Marbled Charger Mirror DIY

Hit the dollar store for some plastic chargers and round mirrors and make yourself some perfect little home accents!  Mix a few of your favorite colors with the new POURING MEDIUM from DecoArt and then swirl them together to create a beautiful marbled effect.  When the paint is dry, glue a round mirror in the center, a looped ribbon in the back for hanging with some E-6000 and you're ready to decorate!  Remember to visit dollar stores and thrift stores for inspiration (and to save a little money)
and don't forget to Make Your Mark!
 Perfect little accent!
 Mirror, mirror on the wall....

Watch how to make them here!
 Mix your favorite colors together and see what happens!
Just gorgeous!

Friday, November 2, 2018

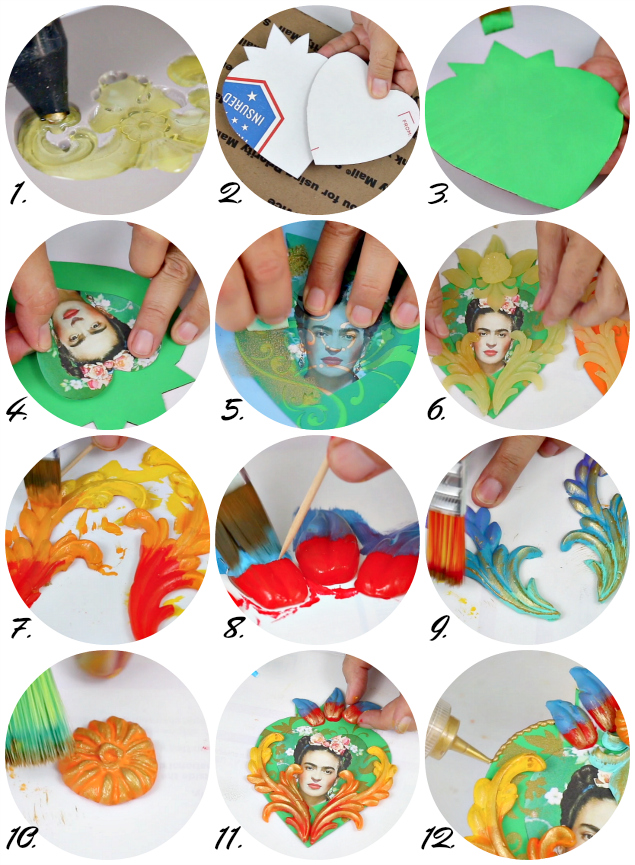
Mexico Inspired Ornaments

I love everything about Mexico.  The color, the art, the architecture and the FOOD all make me fantastically happy!  It's part of why I love living in Los Angeles so much. Years ago I bought a painted, hand carved ornament in Mexico City and have always been inspired by it.  These are a cardboard and hot glue version of that ornament and I couldn't be happier with them.  Grab a few re•design with Prima silicone molds and you'll be making ornaments for the next 10 years!
We have tons of ornament DIYs coming your way so stay tuned and don't forget
to Make Your Mark!
Fabulous Frida!

Use images or just go for color!
STUFF I USED
Cardboard 
Glue gun and tons of glue sticks
Images of Frida or sacred hearts
HERE'S HOW
1.  Fill the re•design with Prima molds with hot glue
*I like to use 2 large glue guns with the big fat glue sticks so that I can fill them quickly
2.  Cut out hearts in cardboard
3.  Paint the pieces in bright colors
*I used Americana Acrylics in Bright Orange and Bright Green
4.  Cut out and glue an image in the center of one of your hearts
5.  Stencil around the image with DecoArt Matte Metallics in Vintage Brass
*I used a Tracy Moreau stencil for this ornament
6. Figure out the molded piece arrangement
7. & 8. Paint the pieces in more Americana Acrylics and let dry
9. & 10.  Dry brush the pieces with Matte Metallics 
11.  Glue the pieces to the cardboard
12.  Edge in E-6000 Dimensional Design Adhesive Paint in Gold Leaf
Fiesta Fantastic!
Feliz Navidad!