Friday, March 23, 2018

No Sew Quilt

Last month on a FB Live I was challenged by Thai Thompson to make a no-sew quilt project.  I seriously had no idea what I was getting myself into, but I'm so glad I took the challenge!  Not one single stitch was used to put this together....NOT ONE!  Immediately I remembered the honor I had making a quilt with the ladies of Gee's Bend for the show While You Were Out.  I loved their graphic patterns and bold use of color and because of that experience, I based my quilt on their work.  Challenge yourself at every turn, possums and don't be afraid to Make Your Mark!
 Tacked to the fence like art!
Perched on my wood pile!
 Ready for a picnic!
Watch how to make it here!
HERE'S WHAT I USED
60" Wide Colorful Cotton Twill
*2 1/2 Yards each of 6 colors 
Iron and straight pins
HERE'S HOW
1.  Create a puzzle box pattern on a 16 1/2" x 16 1/2" square
*Trace & cut at least 3 copies of this pattern
2. Create a plain 19" x 19" square pattern
3. & 4.  Layer the cotton twill and cut 12 16 1/2" x 16 1/2" squares
*2 of each color of cotton twill
 5. Layer the cotton twill and cut 24 19" x 19" squares
*4 of each color
6. & 7.  Cut the "puzzle box" pieces in fabric 
*all 12 layers
8. & 9. Place the puzzle pieces on a 19" x 19" square and glue them in place with E-6000 Fabri-Fuse
*Mix the colors and glue the pieces about 1/4" apart
10.  You'll need to create 12 squares with puzzle pieces
11. & 12.  Fabri-Fuse the squares together side by side
*My quilt was 3 squares by 4 squares
(part 2 below)
 13.  Glue the remaining 12 19" x 19" squares together to create the back
*3 squares by 4 squares
14.  Cut the batting to fit on the quilt and trim if necessary
*The Fairfield batting it thin so I used 2 layers
15.  Fabri-Fuse the first layer of batting to the back of the quilt
16.  Glue the 2nd layer of batting to the first
17.  Fabri-Fuse the top of the quilt to the top layer of batting
18.  Pin all around the edge of the quilt
19.  Cut 1 1/2" wide fabric strips
*enough to circle the entire quilt
20.  Glue the strips to the edge of the quilt with 3/4" hanging over the edge
and let dry
21.  Flip the quilt and iron the remaining 3/4" over the edge of the quilt and glue in place
So ready to be displayed!
Rome wasn't quilt in a day!

Tuesday, March 20, 2018

Roadside Rescue Chair Makeover

Do you ever just pull over to the curb and check out a pile of furniture ready for the heap?  I do it all the time!  I've found some amazing pieces casually tossed out by people who were moving, redecorating or just plain tired of something that was in great condition.  These discarded pieces are the perfect canvas for every crazy idea I want to try...because they are free.  Free equals fearless in my book!  This chair looked so sad outside of a local law firm in my neighborhood and I had to bring it home just to play around with some new techniques and to see if I could change the vinyl up a bit. It's not totally my style, but I'm still pretty happy with the results.  Don't be afraid to dumpster dive and always try to Make Your Mark! 

Handsome and ready for a change!
Light blue vinyl...Why not?!

Learn my techniques here!
STUFF I USED
An old vinyl upholstered chair
DecoArt Patent Leather Paint in Turquoise
Americana Decor Stencils
Americana Decor Chalky Finish Paint in Keepsake and Bestow
Americana Decor Light Satin Varnish
Americana Decor Metallics in Vintage Brass
HERE'S HOW
*Before you start make sure to remove all dirt and dust
1.  Paint the leather with DecoArt Patent Leather in Turquoise
2.  Paint the wood with chalky finish in Keepsake
3.  Coat the chalky finish with Light Satin Varnish and let dry
4.  Paint over the details with chalky finish in Besto
5. & 6.  Wipe away the Bestow before it dries with a rag to expose the details
*The Bestow will fill in the cracks and highlight any details & creases
7.  Stencil the seat with Vintage Brass
8. Stencil the upper part of the legs with more Vintage Brass
Have a seat!
I may put this back in front of the law firm where I found it.....Just to see if they will love it again!

Friday, March 16, 2018

Floral Lampshades with Unicorn SPiT

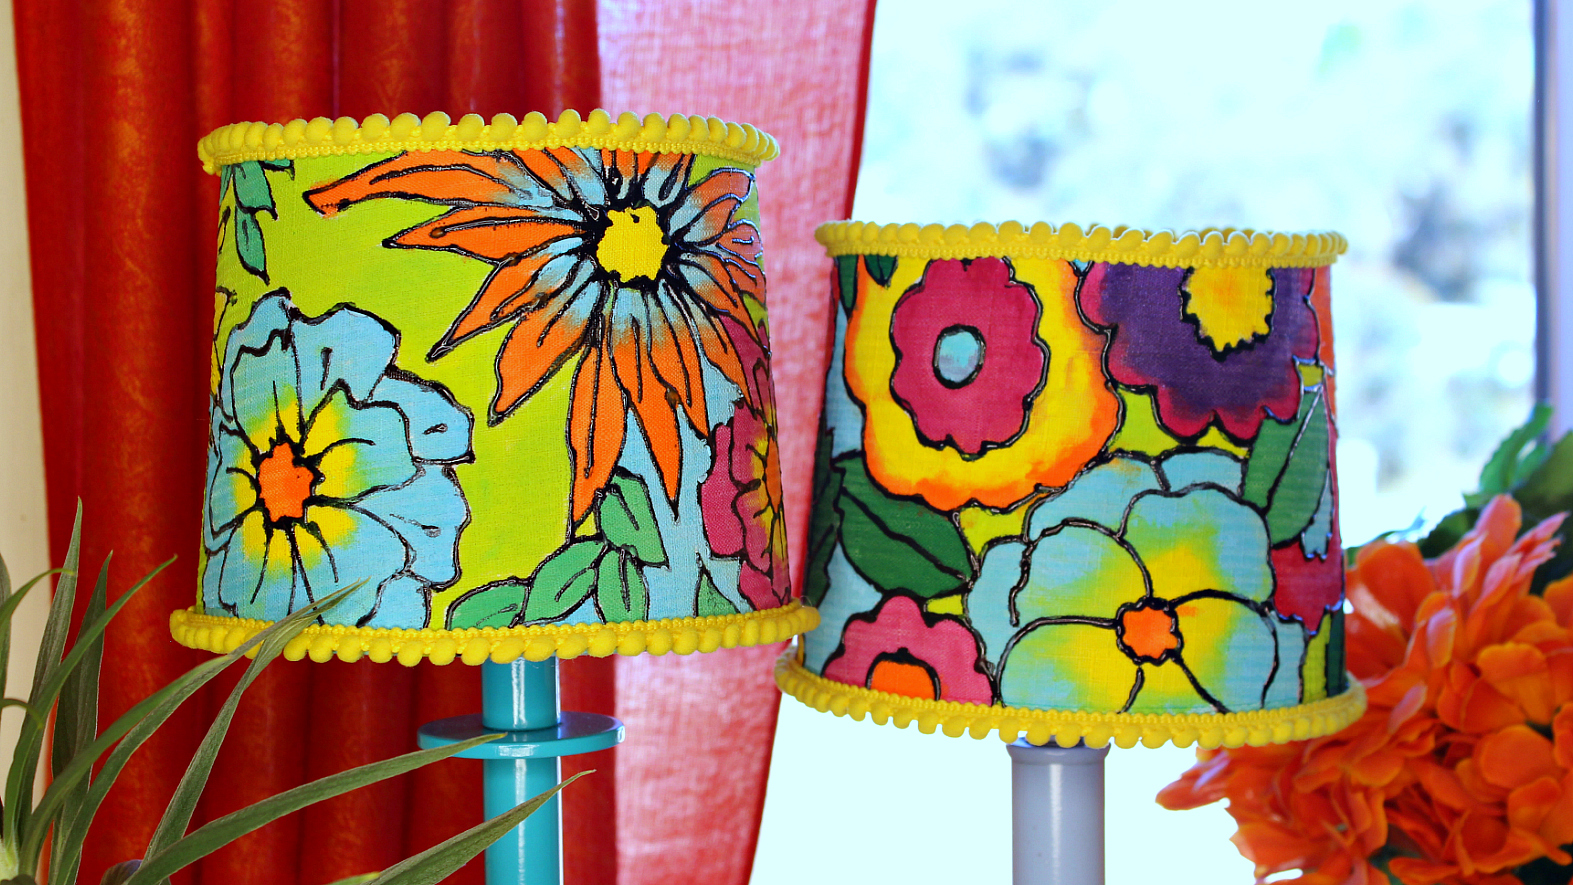
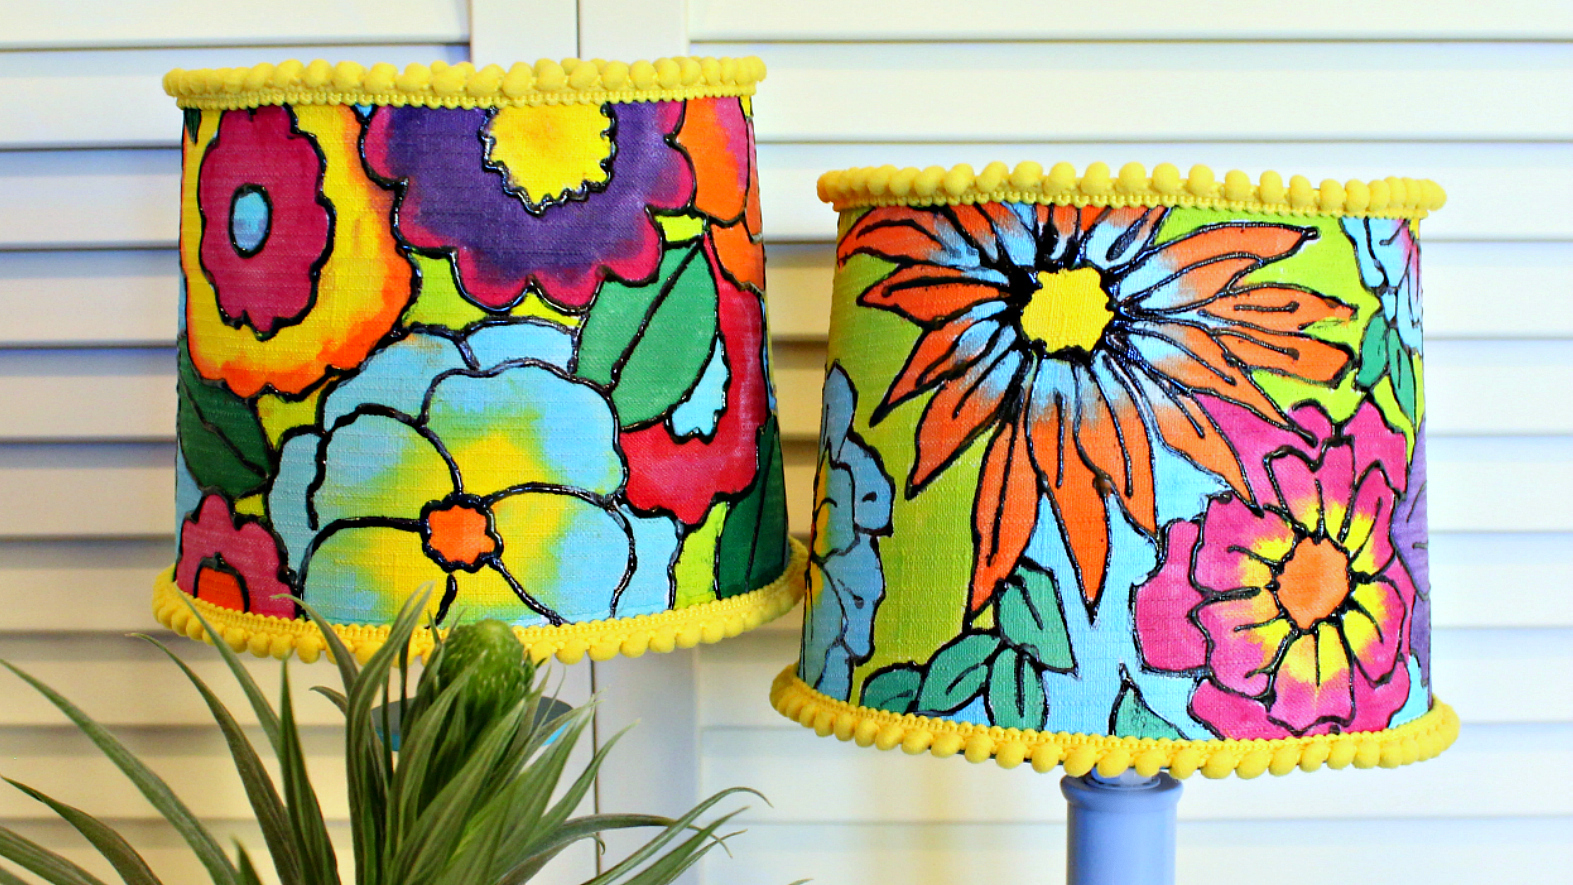
I snagged some simple lampshades at a thrift store for a song and you know me, if I can paint it or glue something on it, it's not safe! It's just how I live my life, friends.  I pulled out a few of my favorite adult coloring book pages for a pattern inspiration and then went nuts with my stash of Unicorn SPiT.  I used floral pages, but any pattern would work.  You might try copying the page and coloring it before you jump into painting the lampshade. This way you'll know how you want them to look.  I think they give a stained glass feel and that's just fine with me.  Remember, if it's not tied down, embellish it!  Oh, and always Make Your Mark!
 Flower power!
 Brightening a corner of my kitchen

Watch how to make them here!
STUFF I USED
Plain fabric lampshades
Allure Dimensional Design Adhesive Paint in Gloss Black
Clothespins 
Pompom trim
E-6000 Fabri-Fuse
HERE'S HOW
1.  Trace the shape of the lampshade on the back of the adult coloring book page and cut out
2.  Tape it inside the lampshade and put the lamp inside
3.  With the lightbulb on, trace the pages lightly with a pencil
4.  Trace over the pencil lines with Allure in Gloss Black and let dry
5. - 9. Slightly water down your favorite colors of Unicorn SPiT and start painting the flowers and leaves
10.  When the shades are dry, spray them with Minwax lacquer and let dry
11.  Using E-6000 Fabri-Fuse, glue mini pompom trim around the rims of each shade
12.  Hold in place with clothespins while they dry
 Brilliant and blooming!
Spring has sprung!

Tuesday, March 13, 2018

Dolce and Gabbana Inspired Purse

One of my YouTube subscribers challenged me to make a Dolce and Gabbana inspired purse and she even sent me photos of her favorites to inspire me.  Now, even though mine isn't an exact copy, I think the idea is still there and I'm pretty happy with it.  This is an idea that you could use on all kinds of accessories!  The base is a thrift store find, but after a few minutes on the internet I realized that finding a pink purse is about the easiest thing in the world, so don't panic!  I even think a mint green or light blue bag would work well, too.  Start making your spring accessories so you're runway ready and don't forget to Make Your Mark!

This is the original
Ready for a spring day out

Watch how to make it here!
STUFF I USED
Pink thrift store purse
Small butane torch or long arm lighter
 HERE'S HOW
1.  Mix a small amount of resin according to directions
2.  Pour in the silicone molds you want to use and pop the bubbles with a blow torch
*Let cure overnight
3.  Spray paint the resin pieces with metallic gold
4.  Cut the printout the shape of the front of the purse
5.  Arrange your gold resin pieces around the rose printout and trace around the inside
6.  Cut out the pattern
7.  Using Americana Fabric Decoupage, adhere it to the purse front
8. Using E-6000 Glue, add the gold resin pieces to the purse and let dry
9.  Add some pieces to the strap as well
Runway ready!

Friday, March 9, 2018

Gel Press Mixed Media Vases

Do you have a collection of glass vases cluttering up your pantry like I do?  I just can't seem to pass up a free centerpiece, thrift store find, roadside rescue or yard sale vase.  HELP ME!  Fortunately I find them a constant source of inspiration for my projects.  This week I decided to turn them into colorful, mixed media vases with my Gel Press.  I LOVE the way they turned out, too! For this project I allowed myself to go nuts with color and stencils and techniques, not caring about the results and just having fun.  There is something wonderful about creativity without boundaries.....It's feels like flying.  Remember to let your creativity go crazy without expectation and always 
Make Your Mark!
Clippings from my garden!
I could have made 100 of these!
No two are the same!

Watch how to make them here!
STUFF I USED
Gel Press & brayer
Americana Acrylics
DuraClear Gloss Varnish
Copy paper
Americana Matte Decoupage
Glass Vases
Various stencils
HERE'S HOW
1.  Squirt 3 colors on your paint on the Gel Press
2.  Spread them with your brayer
3.  Press the paper on the paint 
4.  Carefully pull up the paper and let dry
5.  Try different color combinations
*I like working with lighter colors for the first layer
6.  Add some darker, contrasting colors on the Gel Press
7.  Lay down some stencils on top of the paint
8.  Press a previously Gel Pressed sheet on top of the stencils
9.  Carefully lift to expose the beautiful patterns
10.  Try different color combinations and different stencils
11.  Transfer to the previously Gel Pressed sheets
12.  Cut the sheets to fit a vase making sure to add 1" long slits along one edge
13.  Mist the paper with water
14.  Spread the decoupage medium on the back of the Gel Pressed sheet
15.  Adhere it to the vase and adhere the slit tabs around the underside of the vase
*Mix different Gel Pressed sheets and color combinations to get the design you want 
16.  Seal each vase with DuraClear Gloss Varnish when they are completely covered
Fresh!
These make me happy!

Tuesday, March 6, 2018

Marie Antionette Table Makeover

I found this table for $15 at my local thrift store and could not pass it up!  I'm sure it came from a recently closed,  Hollywood motel in my area because there were at least 10 of them!  At first glance I thought it was super tacky, but after taking a closer look and seeing all of the details, I quickly snapped it up for this makeover project.  Not exactly sure how Marie Antionette became the inspirations,  I just kept thinking of her when I was painting the base in pink and gold.  When that happens, you go with it!  If you have a better name, I'd love to know!  Remember to always look for the potential in things and always try to Make Your Mark!
 All this needs is a pink phone!
Looks so pretty on my faux lawn!
Pink with black and white stripes REALLY does it for me!
Watch how I did it here!
STUFF I USED
Thrift store table
Masking Tape
Sander
Gold metallic marker
HERE'S HOW
1.  Sand down the imperfections on the table top if there are any
2.  Paint the top in Americana Decor Satin Enamels in white and let dry
3.  Paint the base in Americana Decor Chalky Finish in Remenisce
4.  Create stripes with masking tape across the table top
*I used 1 1/2" wide tape and spaced it every 1 1/2" for even stripes across the table
5.  IMPORTANT!  Once the tape is down, add more white paint along both edges 
of each strip of tape
*The white paint will seep under the tape and create a barrier so the black does not seep under the tape and create fuzzy lines
6.  Carefully paint black in between the taped lines
7.  Carefully remove the tape when the paint is almost dry
8.  Paint the edge of the table with Americana Decor Metallics in Vintage Brass
*This is hands down my favorite metallic paint!
9.  Edge the table with a paint marker so that you have a perfectly crisp metallic gold edge
10. & 11. Bring out the details by using a dry brush dipped in a tiny bit of gold and brushing it across the flourishes
12.  Ready to decorate!


Friday, March 2, 2018

Art Crayon Art Journals

I'm cuckoo for Marabu's Art Crayons and all of the beautiful art journal techniques you can create with them!  I was so excited about my pages I decided to bind them with fabulous marbled covers. What I've created are my initial pages which will eventually be rubber stamped, decoupaged and written on.  You know, like a real, organic art journal that just keeps on keepin'-on!  What I love most about the art crayons is that you can manipulate them with sponges and water and when you're finally satisfied, you can spray them with a fixative for further work with other mediums.  I had some scrap wood pieces from another project and they made perfect covers.  Turn your work into beautiful art journals and don't forget to Make Your Mark!
A few of my new journal pages
 The clear school glue technique is my favorite!
Bound for glory!
Watch how to make them here!
STUFF I USED
5 1/2" x 7" thin wood pieces
Swing Arm Paper Cutter
Stencils
Black and white gesso
HERE'S HOW TO MAKE THE PAGES
Technique One
1. Moisten a cosmetic sponge
2. Rub an Art Crayon on the end
3. Dab onto watercolor paper using different colors
4. Repeat with a stencil in a contrasting color
5. When dry lightly spray with a fixative
Technique Two
6.  Go crazy with Art Crayons on watercolor paper
7. Blend the colors with a lightly damp cosmetic sponge
8.  Stencil over the page with black gesso
9.  Lightly spray with a fixative
Technique Three
10.  Coat a piece of watercolor paper with white gesso and let dry
11. Use a generous amount of Art Crayon color
12.  Blend the colors with a dry cosmetic sponge
13. Stencil with white gesso or a fun paint
Technique Four
14.  Paint over a stencil with clear, washable school glue and let dry
15.  Go crazy with Art Crayons
16.  Blend the Art Crayons with a dry cosmetic sponge allowing the color to be removed 
from the dry glue
17.  Stencil over the pieces with black gesso or another color
Technique Five
18.  Stencil with black gesso on watercolor paper
19. Add a generous amount of Art Crayon over the top
20.  Paint over the Art Crayon with a brush and water for a beautiful watercolor effect
HERE'S HOW TO BIND YOUR JOURNALS
1. -4.  Make sure your art journal pages are the same size as your wood covers
*I cut my pages first and then filled them with different Art Crayon techniques
5. Fill a tub with water and sprinkle your favorite colors of Easy Marble on top
6.  Place paper face down on the Easy Marble to pick up the beautiful marbling
7. Let dry
8.  Moisten the marbled pages with a light spray of water to relax the paper
9.  Add glue or decoupage medium to the wood piece
10.  Center it on the marbled paper making sure it's completely flat
11.  Cut out the corners at a slight angle
12. & 13.  Add glue to the flaps and glue them to the other side
14.  Clamp your art journal pages between 2 covers making sure everything is 
completely even and flat and then spread Book/Pad Compound along the edge and let dry
15.  Cover up the binding with matching paper using more glue
Bound art journals ready to embellish even more!
 Go crazy with color and stencils!
If you don't have wood, you could use a sturdy cardboard OR chipboard